Based on the steps in the previous posts, in my situation I’m targeting to mine 4-6 HNT per month, and found that the popular and successful miners in my area are the Bobcat Helium miner using a 6-8dBi antenna so this is what I ordered from Helium Deploy (a Canadian reseller of Helium miners and other accessories). Mind you I am still waiting to receive confirmation that my order has been shipped (which should be in the next week or so), as I ordered this the last week of November and estimated delivery was within 4-6 weeks. So now I am preparing for the network setup, miner placement, and antenna installation within my house.
Throughout my research the number one way to get the best performance of your miner is to get your antenna up as high as you can. Considering it’s currently winter in Canada, so there is no chance of me crawling up on my roof to install an external antenna, the best option for me to start would be in the window of a room on the second floor, and work towards putting up an external antenna in the summertime as outlined below.
Installation Phase #1
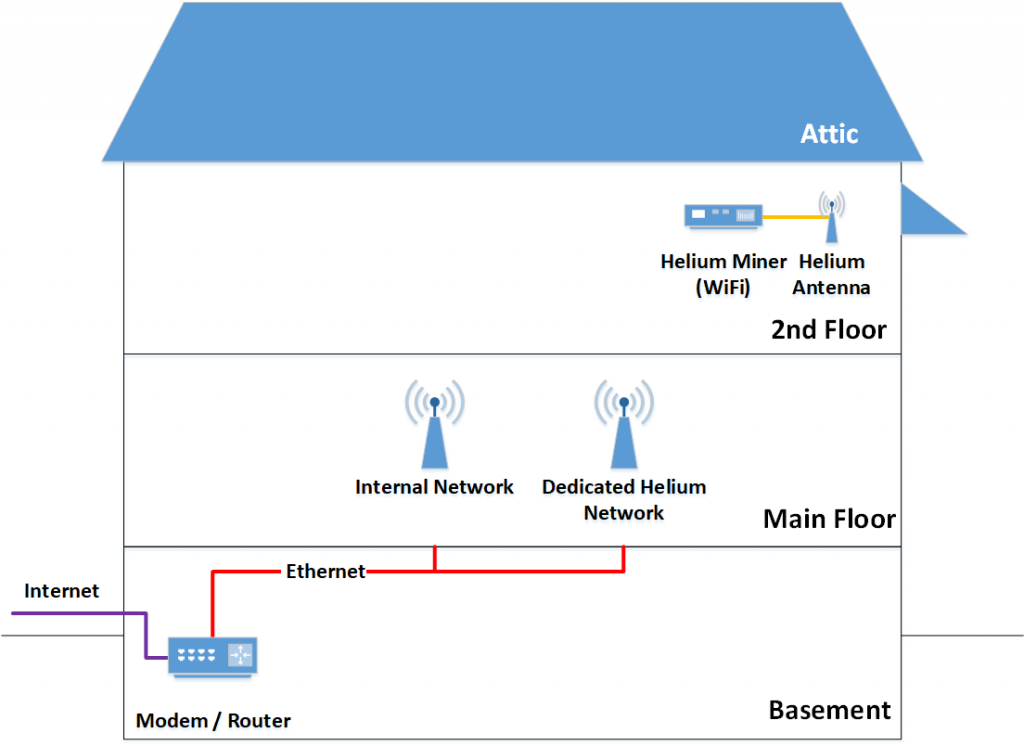
The first stage of my installation plan is to simply install the miner and provide 4dbi antenna in a window in the second floor, and connect the Bobcat miner to my dedicated Bobcat wifi access points which are connected via Ethernet cable to the router and internet. The objective of this installation phase is simply to test the hardware, create the helium accounts, wallets and other setups, and get everything setup and working. This will also establish the performance and profit baseline, without purchasing additional hardware.
In my situation placing the Bobcat antenna by the second floor sounds great, but the problem is I have a huge metal awning that covers most of my window, similar to the below. So I have no idea how this will impact the signal strength or performance, in some cases I heard that metal close to your antenna can increase your signal strength, while other say the complete opposite. I’m interested to see how this turns out, and where the helium witnesses are that see me when I get it up and running. Unfortunately, all windows in the second floor have the same style awnings so I cannot simply move it to another room. So the next best solution is to move it into the attic.

Please Note: In the drawings provided I have a second independent wifi access point dedicated to the Helium miner. The reason for this is that I want to segregate and restrict helium related traffic, with my other internal and personal internet and local network connectivity.
Installation Phase #2
The mid-term plan is to upgrade the provided antenna with the 6dBi one I purchased, and place this in the attic. I believe with moving the antenna to the attic, the antenna signal would be on top of the metal awning, so this should enhance performance, and with the antenna upgrade this would put me inline with the other successful miners in my area.
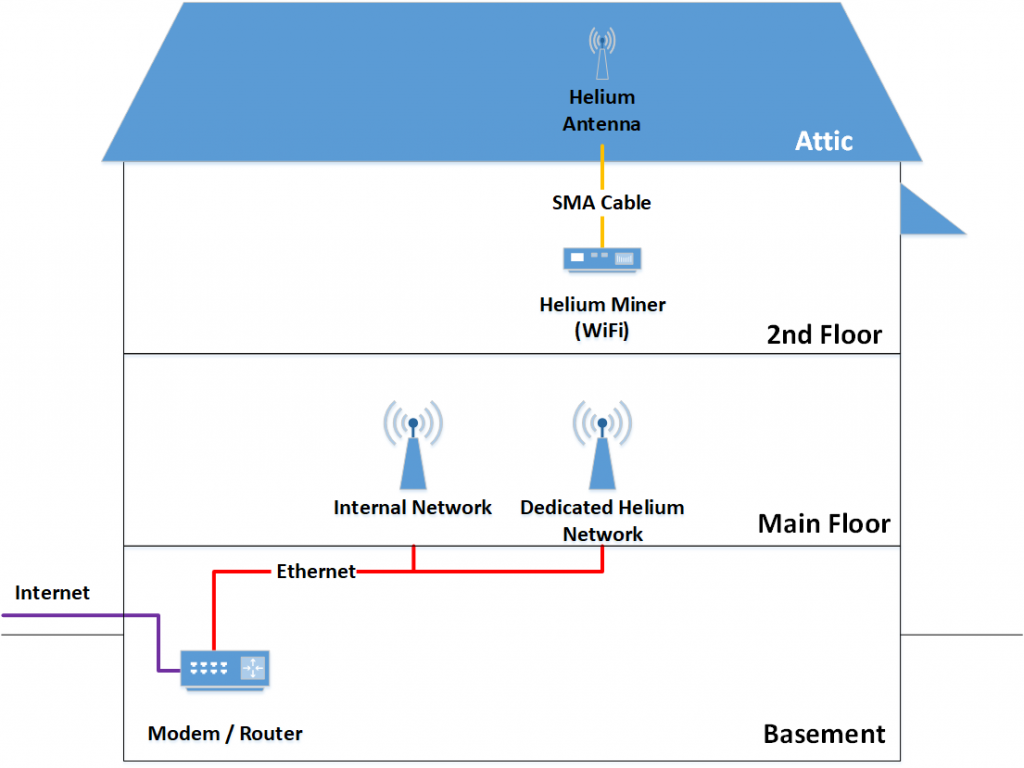
Unfortunately with moving the antenna this would require a longer antenna cable (such as RG58 Coaxial Cable or LMR400 and roughly 20-30 ft), and some brackets or hangers to help with the cable management as it goes up the wall and into the attic. Something like the below would work for my situation and is around $30 CAD on Amazon. For the hangers I am just thinking at this point to just use dollar store peel and stick hangers, or finishing nails.

Now that we will have a cable in the attic we will need to rig up and mount the antenna to something. There are a two options here, the first is to just look around my garage and try to build some type of mount, or purchase one. In either solution the pole would need to be able support a 3 foot pole (attic height), and also be able to support itself over the exposed ceiling joists in my attic. This would require some type of base like a small piece of plywood and from there the homemade or purchase mast would need to mount and screw into this for support.

Suitable masts are available for around $25 such as the one above on Amazon. As my longer term plan for the installation is to move this outside when the weather is better. I would like to use the same antenna mast for the attic install as well the external installation so I am taking this into consideration when selecting a suitable mast for both.
Installation Phase #3
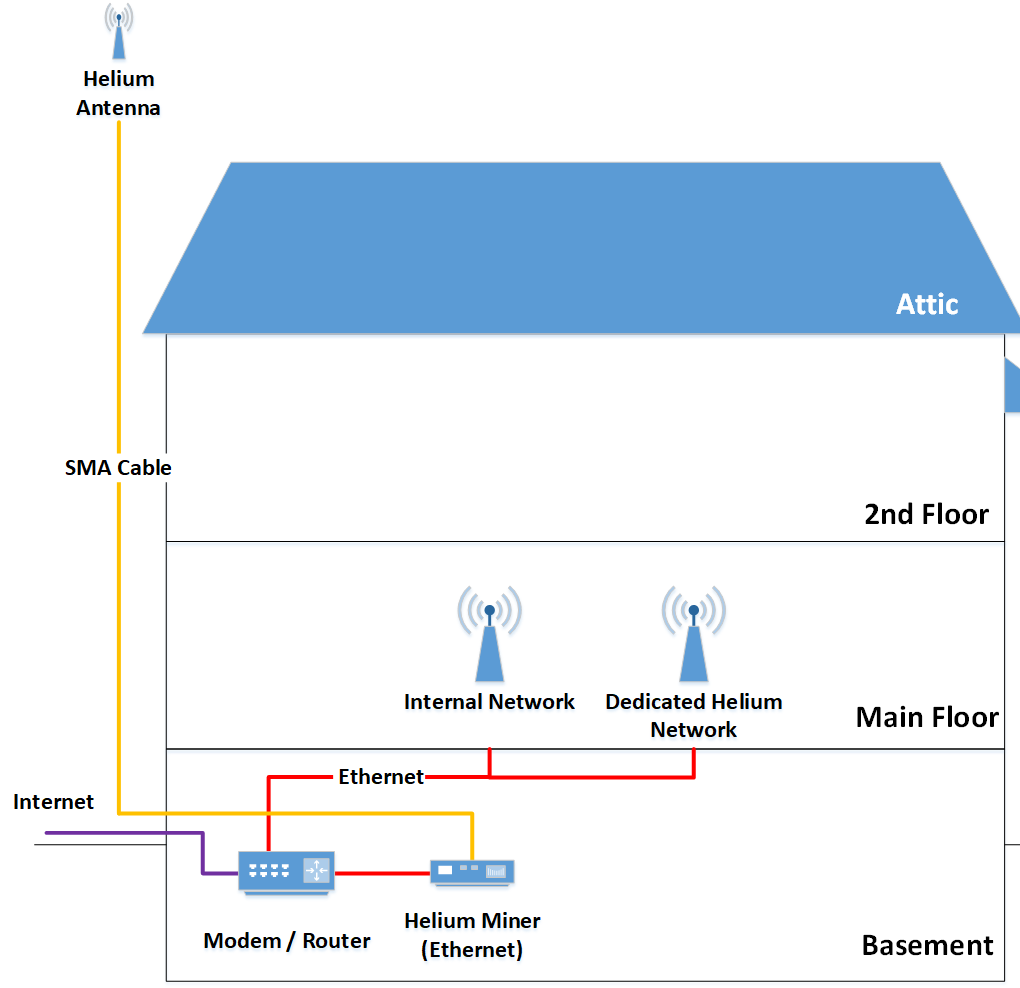
The longer term goal is to have the Helium antenna installed above the peak of my roof at the back of my house. This would roughly put my antenna height at ~10+ metres, one of the highest hotspots in my area, and also would be able to connect the bobcat miner directly to my internet connection through Ethernet as opposed to wifi. This installation will be a more difficult installation as I would need to attach an antenna mast to the peak of my house then run a ground wire (via a lightning arrestor) to a grounding rod, and also the antenna cable (RG58 Coaxial Cable or LMR400) to the demarcation point of all my telco equipment which is in the basement of the house.
To do the above installation again we will need to go shopping and pickup a few necessary pieces of hardware.
- Lightening Arrestor
- 50′ – 75′ of antenna cable (RG58 Coaxial Cable or LMR 400)
- Grounding Cable
- Grounding Rod
- Antenna Mast (can use the same as above)
- Misc. Bolt and brackets
From what I have seen the the lightening arrestor is around $30 CAD, the 75 feet of RG58 cable is around $65 CAD, the grounding cable is around $40 CAD, the grounding rod is around $50 CAD, plus additional random bolts and brackets $20 CAD. In total to mount my external antenna would cost an additional $200 CAD for parts and equipment.
I am looking forward to receiving my Helium miners and setting it up as described above to see how close and accurate my initial planning and research was. The good news is that I received an update regarding my order and the delivery dates for my Helium miner and antenna, and I am expected to receive this sometime next week. I’ll provide updates and additional blog posts when I am going through the setup and installation process to continue to document my Helium Mining journey.
Check out the other posts in my “So I ordered a Helium Miner” Blog series:
- So I ordered a Helium Miner….. (Part #1)
- So I ordered a Helium Miner….. (Part #2) – Profitability and Equipment
- So I ordered a Helium Miner….. (Part #4) – UPDATED Estimated Setup, Installation and Network Connectivity
- My Bobcat 300 – Helium Miner Finally Arrived !!!
- Updated Helium Miner setup and Connectivity – Part #1