In my previous post, I outlined three different installations that I was planning on for when I installed my Helium miner. The first was simply set the antenna by a window, the next was move the antenna to the attic, third was to mount the antenna on my roof. I have been thinking about the additional costs that would be associated with each of these phases and what would be the most cost effective approach, and how I could save and/or reuse hardware.
Coming from a computer and IT background, in my opinion each of these solutions had their strengths and weaknesses, and as always areas for improvement. In my first solution (shown below), for example I was simply going to connect by Bobcat Helium Miner connect it to wifi and place the antenna by the window. While this would completely work, I had 1 major concern with this, which was the metal screen on the outside of the window, and the metal awning covering half my window. The other concern I had with this installation, while minor was and use of wifi to connect the Bobcat to the internet. I would have preferred to connect the Bobcat to the internet through a wired Ethernet cable, as a device like the bobcat would perform best with a strong and stable network connection.

The benefit of the first solution is that there would be no upfront additional costs, yet either way I would be moving to the second installation as (shown below). With installing the antenna in the attic I would need something to mount the antenna on which is not a big deal because I can build something. The concern is the placement of the antenna in the attic as this would determine the length of antenna cable I would need to run it nicely, from the attic, along the ceiling and down a wall, which I estimated to be about 25 feet.
With a 25 foot cable I may now run into dBi loss due to the length of cable from the antenna to the Bobcat, where I would prefer the loss to be as close to zero as possible. I’ve been in several forums, discussion boards regarding this and the best way to set this up is to install the bobcat as close to the antenna as possible. I could do this by placing the miner in the attic, and then running a power cable up to the attic. Issue now would be the length of the power cable I would need as it would be the same about 20-25 feet. Where I would need to plug an extension cable in, is not in a convenient locations in related to my attic access, so I would need to “nicely” hang the cable along the ceiling and walls.
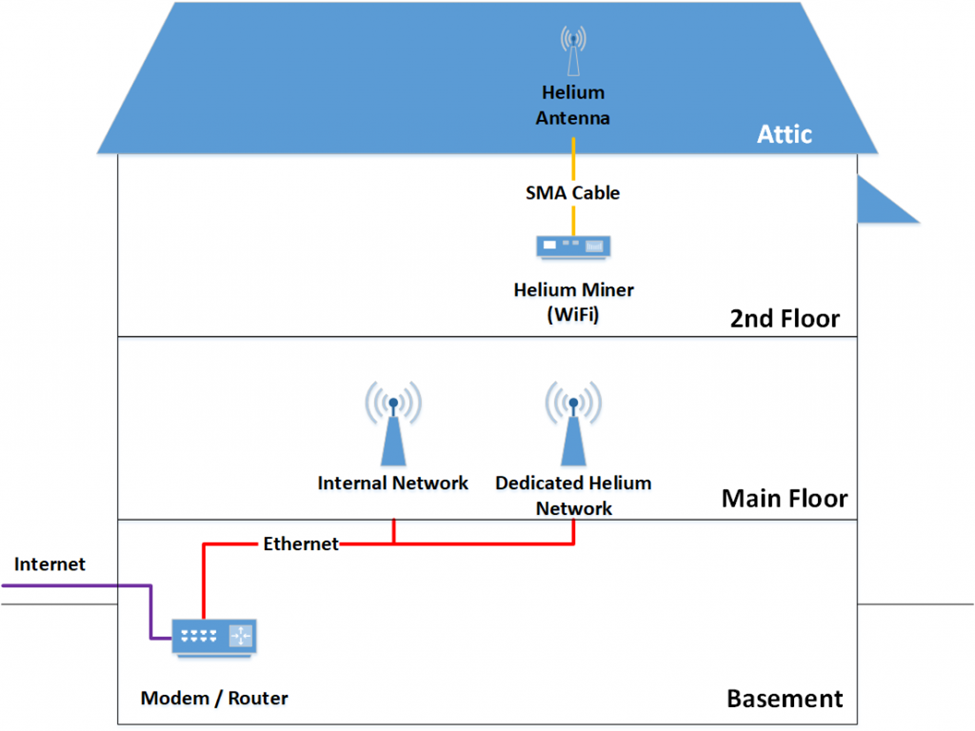
Considering the above concerns I’ve updated my initial plan for installation. My new plan now consists of using PowerLine Networking to get wired Ethernet to my second floor, then use a Power-over-Ethernet connection between the Helium Miner and the PowerLine Network Adapter. This will enable me to connect the Helium Miner in my attic with an Ethernet cable, which will also provide the power required to power the Helium Miner.

So I went shopping yesterday for the following to start building this new plan:
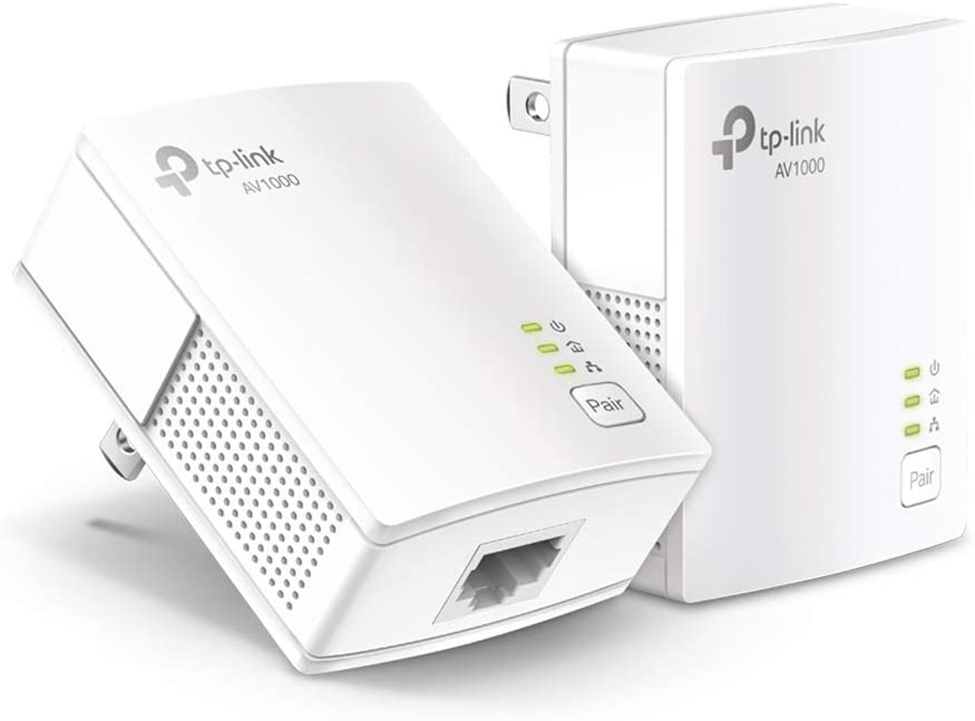
- TP-Link Powerline Ethernet Adapter Starter Kit – AV1000 Gigabit Port, Plug&Play, Ethernet Over Power, Nano Size, Ideal for Smart TV, Online Gaming, Wired Connection Only (TL-PA7017 KIT) This powerline networking kit is used to bring wired internet to my second floor over the copper electrical system. This make and model was selected as I have used TP-Link hardware before and am pleased with it for personal uses, but also because this supports gigabit Ethernet speed. My Bobcat will be installed on a dedicated subnet, and the last thing I would want to see if bandwidth issues. Considering this was also only about $10 more than the 10/100 mb/s it was also an easy buy.
- TP-Link TL-PoE150S Gigabit PoE Injector Adapter, IEEE 802.3af compliant, Up to 100 meters (328 Feet) – The next network hardware device would be the PoE Adapter/Injector which will be connect to the PowerLine Network Adapter over Ethernet and add the Power-over-Ethernet capabilities to the output port on the adapter. From the output, I have a custom cut Ethernet cable roughly 25 feet long that will be used to connect the Bobcat Miner to my home network, and also power the device. I had no real requirements for this other than using a known brand and supports gigabit ethernet speeds.

Passive PoE Injector and PoE Splitter Kit with 5.5×2.1 mm DC Power Adaptor Connector for Network Digital Signal(1 Pair-Black) For the Bobcat miner to take advantage of Power-over-Ethernet, a PoE Splitter is needed to split the ethernet wires (within the cable) to the appropriate connector such as Ethernet (for network), and a barrel connector (for power). I saw this on some Helium / Bobcat Forums and for the $11 is worth the try.- PLEASE NOTE : This PoE Splitter does not work for the Bobcat 300 Helium Miner – Try the Splitter mentioned below

- Update: Gigabit PoE Splitter 48V auf 12V 2A, 5,5×2,5mm DC IEEE 802.3af/at Standard Power Over Ethernet Splitter Adapter für Sicherheits-IP-Kamera, VoIP-Telefon, AP (PS5712TG-25) – Please note that the Bobcat Helium Miner requires a 2A PoE splitter, not the 1A mentioned above. I purchased the above and of course it did not work, yet with the one below it powered up no problems.

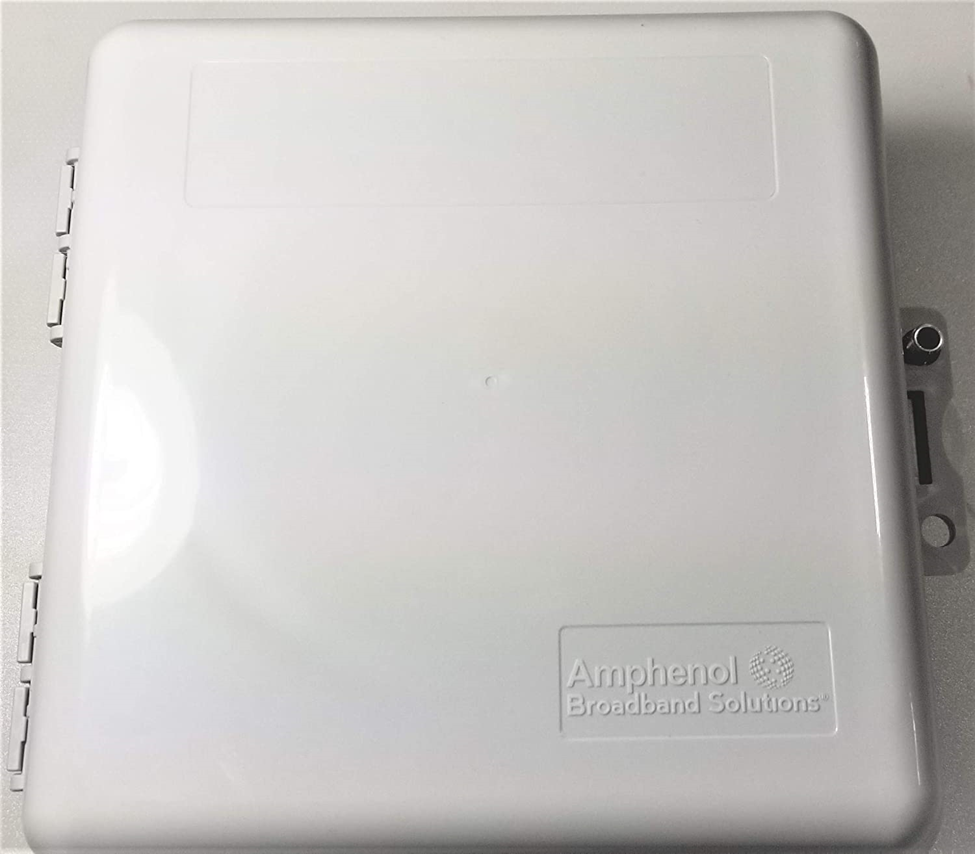
- Heavy Duty Weather Proof Multi Purpose Enclosure Amphenol Broadband 9 x 9 x 4 (Interior Approx. 8 x 8 x 3-1/2) – This will be the casing that will be used to house the Bobcat Miner, and give it some protection from the environmental conditions while in my attic. As it gets quite cold in the winter where I live, I will have to monitor the temperature of the Bobcat to ensure that it remains within the recommended operating temperature to prevent over cooling. If the Bobcat is on the cool end of the recommended operating temperature I will wrap a towel around it to help it retain its heat.
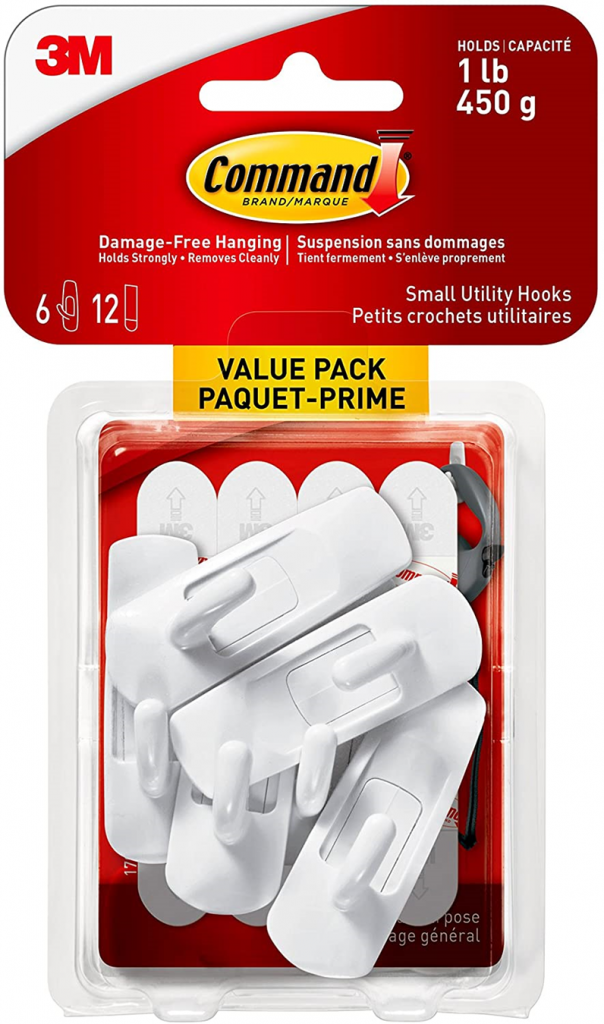
- Command Utility Hooks Value Pack, Small, White, 6 Wall Hooks 12 Small Strips (17002C-VP) – As I will be powering the Bobcat Miner over Ethernet (which is fairly light), I needed a way to hold the cable in place (for a clean installation) as it goes up my wall from the outlet then across the ceiling over to my attic access. For this I wanted to use a plastic “peel and stick” type of wall hook that would not damage my walls when removed.
With good old Amazon luckily I was able to receive all the above items within a few days, and also just received news today that my miner will be delivered tomorrow and antenna within the next few days. I am certainly looking forward to getting my Bobcat miner all setup and installed. I’ll provide another blog update within a week or two to show my progress.
UPDATE: Check out the first video I made regarding how I will be using these parts as part of my Helium Miner installation.
Updated Helium Miner setup and Connectivity – Part #1
Check out the other posts in my “So I ordered a Helium Miner” Blog series:
- So I ordered a Helium Miner….. (Part #1)
- So I ordered a Helium Miner….. (Part #2) – Profitability and Equipment
- So I ordered a Helium Miner….. (Part #3) – Estimated Setup, Installation and Network Connectivity
- My Bobcat 300 – Helium Miner Finally Arrived !!!
- Updated Helium Miner setup and Connectivity – Part #1