In my previous post, I outlined three different installations that I was planning on for when I installed my Helium miner. The first was simply set the antenna by a window, the next was move the antenna to the attic, third was to mount the antenna on my roof. I have been thinking about the additional costs that would be associated with each of these phases and what would be the most cost effective approach, and how I could save and/or reuse hardware.
Coming from a computer and IT background, in my opinion each of these solutions had their strengths and weaknesses, and as always areas for improvement. In my first solution (shown below), for example I was simply going to connect by Bobcat Helium Miner connect it to wifi and place the antenna by the window. While this would completely work, I had 1 major concern with this, which was the metal screen on the outside of the window, and the metal awning covering half my window. The other concern I had with this installation, while minor was and use of wifi to connect the Bobcat to the internet. I would have preferred to connect the Bobcat to the internet through a wired Ethernet cable, as a device like the bobcat would perform best with a strong and stable network connection.
The benefit of the first solution is that there would be no upfront additional costs, yet either way I would be moving to the second installation as (shown below). With installing the antenna in the attic I would need something to mount the antenna on which is not a big deal because I can build something. The concern is the placement of the antenna in the attic as this would determine the length of antenna cable I would need to run it nicely, from the attic, along the ceiling and down a wall, which I estimated to be about 25 feet.
With a 25 foot cable I may now run into dBi loss due to the length of cable from the antenna to the Bobcat, where I would prefer the loss to be as close to zero as possible. I’ve been in several forums, discussion boards regarding this and the best way to set this up is to install the bobcat as close to the antenna as possible. I could do this by placing the miner in the attic, and then running a power cable up to the attic. Issue now would be the length of the power cable I would need as it would be the same about 20-25 feet. Where I would need to plug an extension cable in, is not in a convenient locations in related to my attic access, so I would need to “nicely” hang the cable along the ceiling and walls.
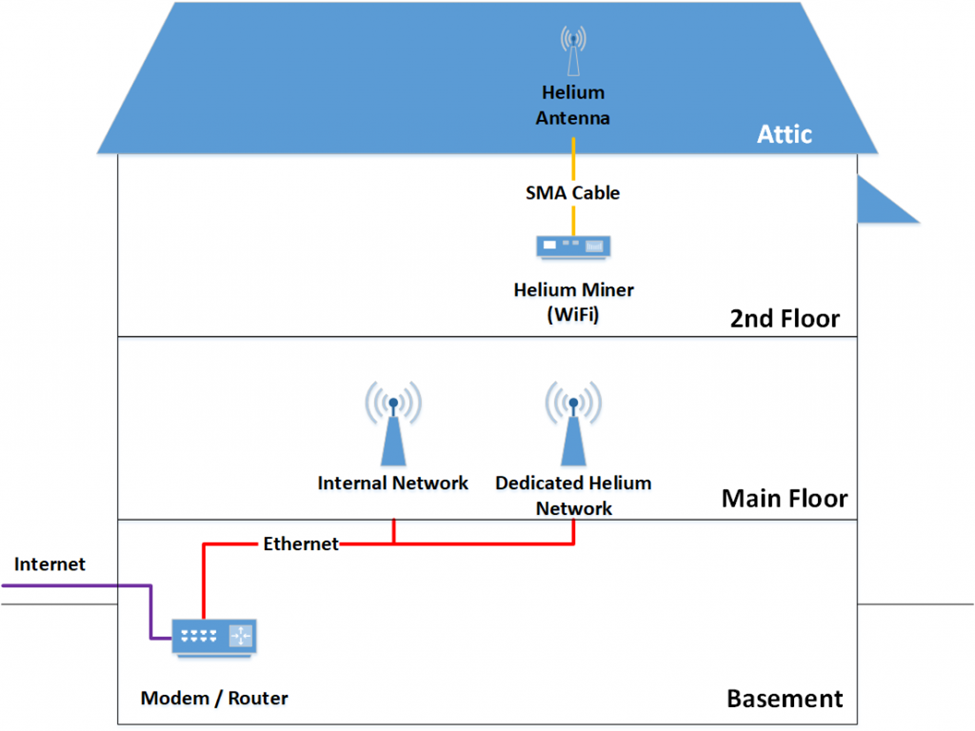
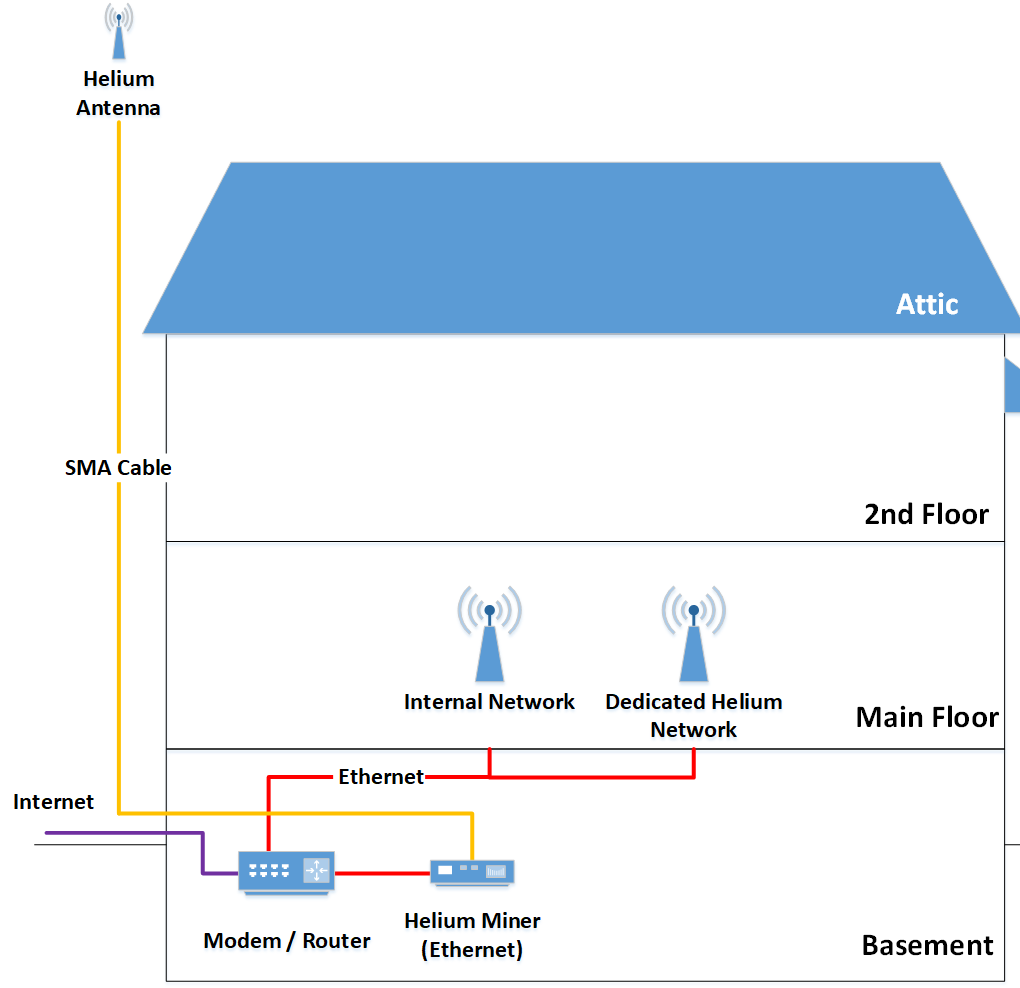
Considering the above concerns I’ve updated my initial plan for installation. My new plan now consists of using PowerLine Networking to get wired Ethernet to my second floor, then use a Power-over-Ethernet connection between the Helium Miner and the PowerLine Network Adapter. This will enable me to connect the Helium Miner in my attic with an Ethernet cable, which will also provide the power required to power the Helium Miner.
So I went shopping yesterday for the following to start building this new plan:
TP-Link TL-PoE150S Gigabit PoE Injector Adapter, IEEE 802.3af compliant, Up to 100 meters (328 Feet) – The next network hardware device would be the PoE Adapter/Injector which will be connect to the PowerLine Network Adapter over Ethernet and add the Power-over-Ethernet capabilities to the output port on the adapter. From the output, I have a custom cut Ethernet cable roughly 25 feet long that will be used to connect the Bobcat Miner to my home network, and also power the device. I had no real requirements for this other than using a known brand and supports gigabit ethernet speeds.
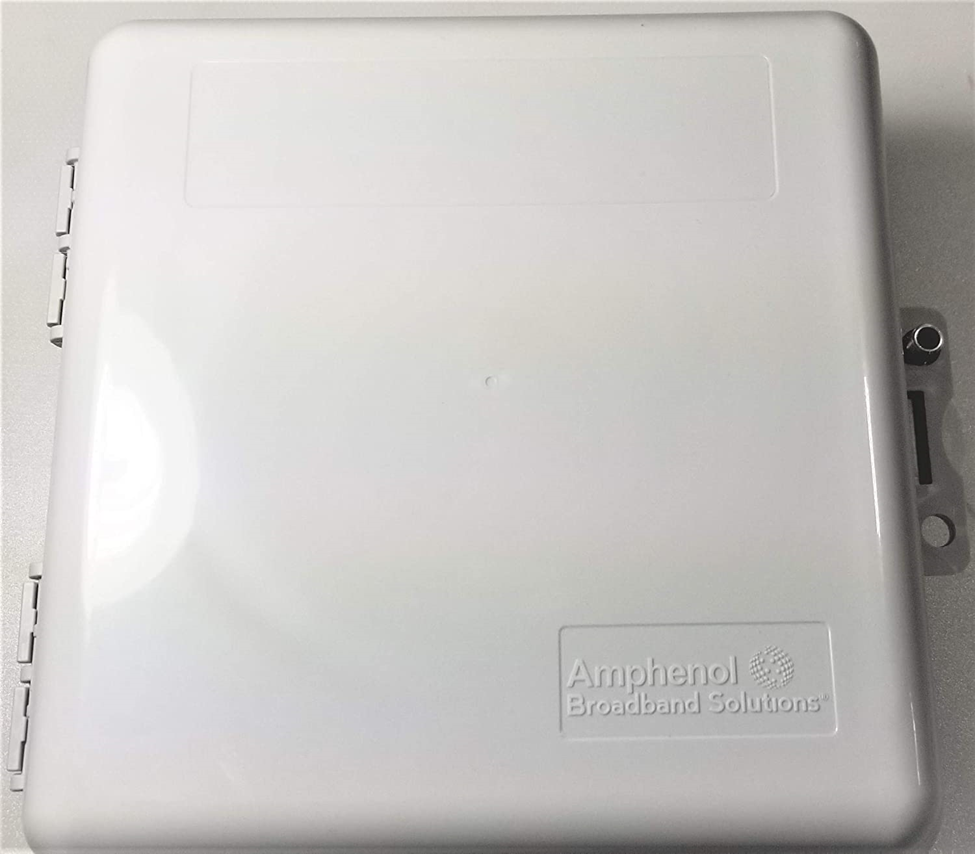
Heavy Duty Weather Proof Multi Purpose Enclosure Amphenol Broadband 9 x 9 x 4 (Interior Approx. 8 x 8 x 3-1/2) – This will be the casing that will be used to house the Bobcat Miner, and give it some protection from the environmental conditions while in my attic. As it gets quite cold in the winter where I live, I will have to monitor the temperature of the Bobcat to ensure that it remains within the recommended operating temperature to prevent over cooling. If the Bobcat is on the cool end of the recommended operating temperature I will wrap a towel around it to help it retain its heat.
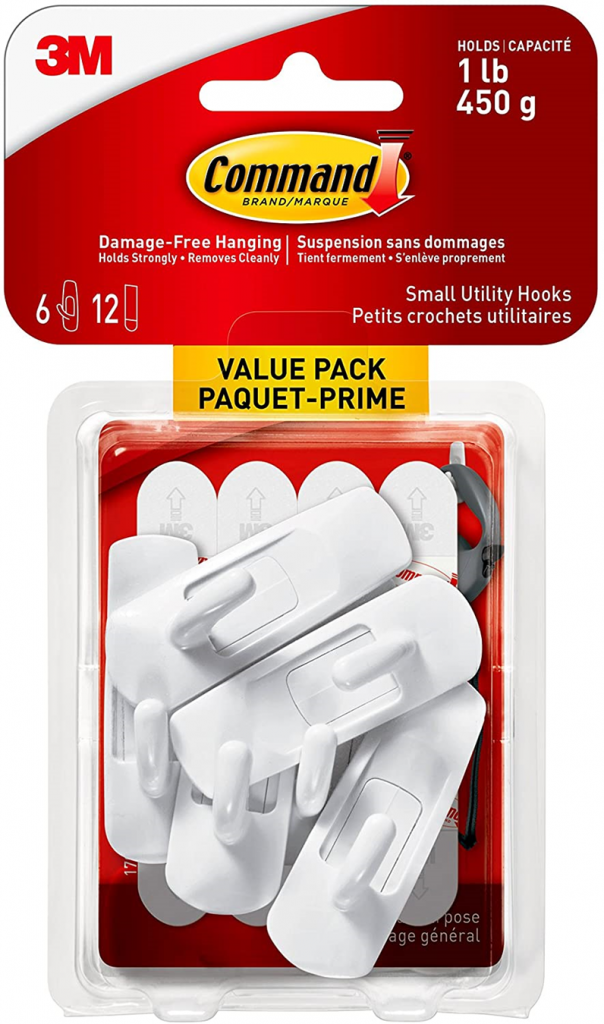
Command Utility Hooks Value Pack, Small, White, 6 Wall Hooks 12 Small Strips (17002C-VP) – As I will be powering the Bobcat Miner over Ethernet (which is fairly light), I needed a way to hold the cable in place (for a clean installation) as it goes up my wall from the outlet then across the ceiling over to my attic access. For this I wanted to use a plastic “peel and stick” type of wall hook that would not damage my walls when removed.
With good old Amazon luckily I was able to receive all the above items within a few days, and also just received news today that my miner will be delivered tomorrow and antenna within the next few days. I am certainly looking forward to getting my Bobcat miner all setup and installed. I’ll provide another blog update within a week or two to show my progress.
UPDATE: Check out the first video I made regarding how I will be using these parts as part of my Helium Miner installation.
As I travelled through my YouTube journey I came across this video by NetworkChuck – Cryptocurrency Mining on a Raspberry Pi (it’s fun….trust me) and thought wait a minute, I have 6 raspberry pi’s, and 3 laptops in my basement sitting there and doing nothing. Mind as well put them to good use and try to make some money mining the Monero crypto-currency with them to see if it is possible to make a profit. NetworkChuck did a great job in the video describing each step of the process for setting everything up on a Raspberry Pi and through some other research the process was almost exactly the same for any other operating system as they all use the same mining program called XMRig to connect to a mining pool and invoke the mining capabilities of your computers CPU.
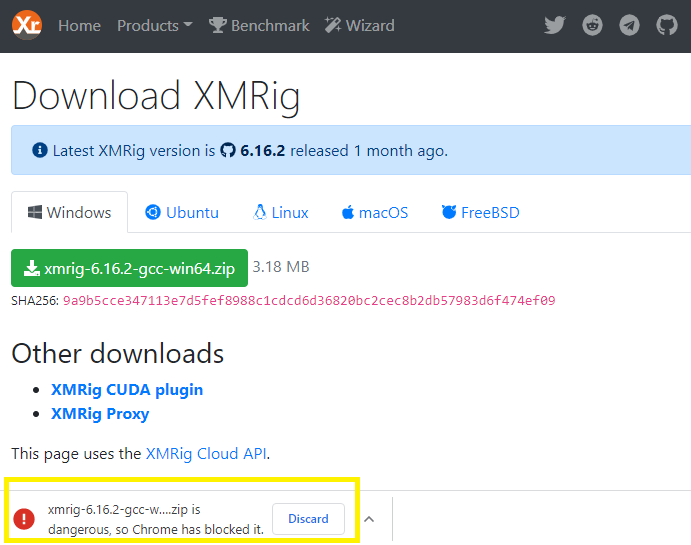
To start I went to the XMRig website and was going to try and install this as a standalone application on one of my Windows based machines to see how hard it is to get it up and running, and connect to the mining pool and start mining. Well this did not go as planned as once I clicked the download button I was presented with the following warning.
XMRig Download Warning – Windows Binary
After clicking the “I understand, show the link” and downloading the XMRig binary executable from the XMRig website, my anti-virus immediately flagged the file as malicious and deleted it from my system.
Anti-Virus Warning of XMRig Download
Next I tried to use an old Lenovo ThinkPad X131e (4GB RAM) that I have with Kali Linux already installed. The installation and setup was fairly simple and straight forward, and took about an hour from start to the point where I could see my miner and workers in the Monero mining pool dashboard. The best resource I found to set this up on a Linux based system was found on a website called VPSFix.com.
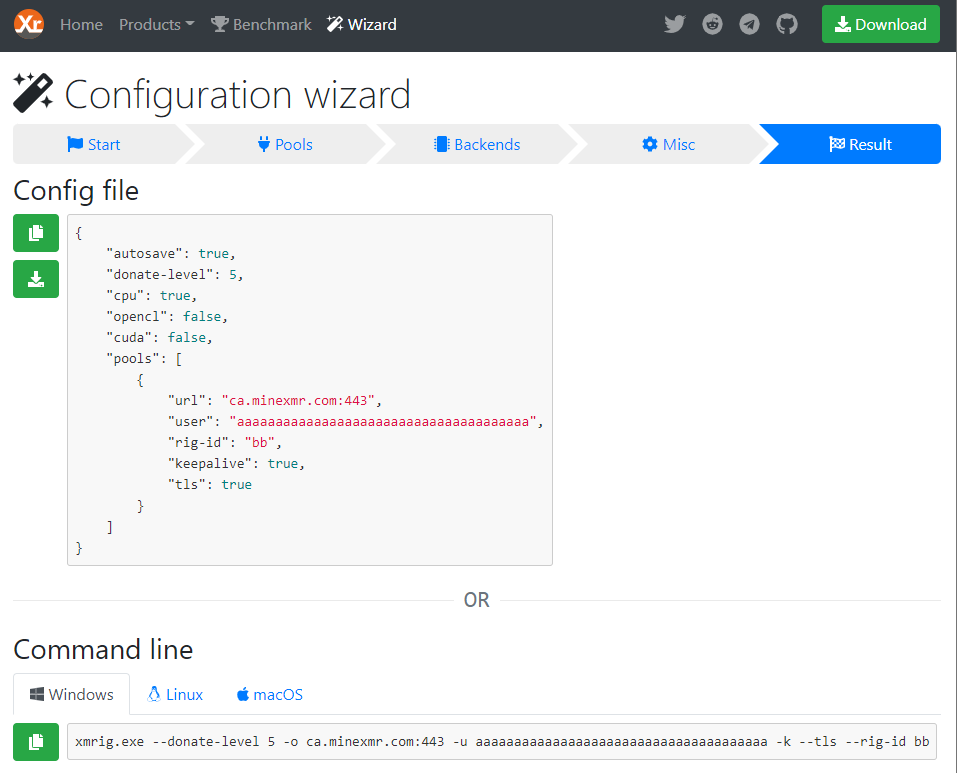
Once the installation and setup has completed you will need to launch the XMRig application by command line which requires a bunch of parameters, flags, and switches within its execution strings as shown in the below example.
Each of these parameters would be unique to yourself and your situation, so it is not a good idea to just copy and paste one you found on the internet otherwise you could be successfully mining, but with the profit going to someone else’s wallet. The best resource I could find on how to setup this command string is on the Configuration Wizard on the XMRig website.
As shown below this wizard simple asks for the mining pool you wish to you, the wallet address for payments, and the worker names, and it produces a json file, and full commands for command line execution.
XMRig – Configuration Wizard
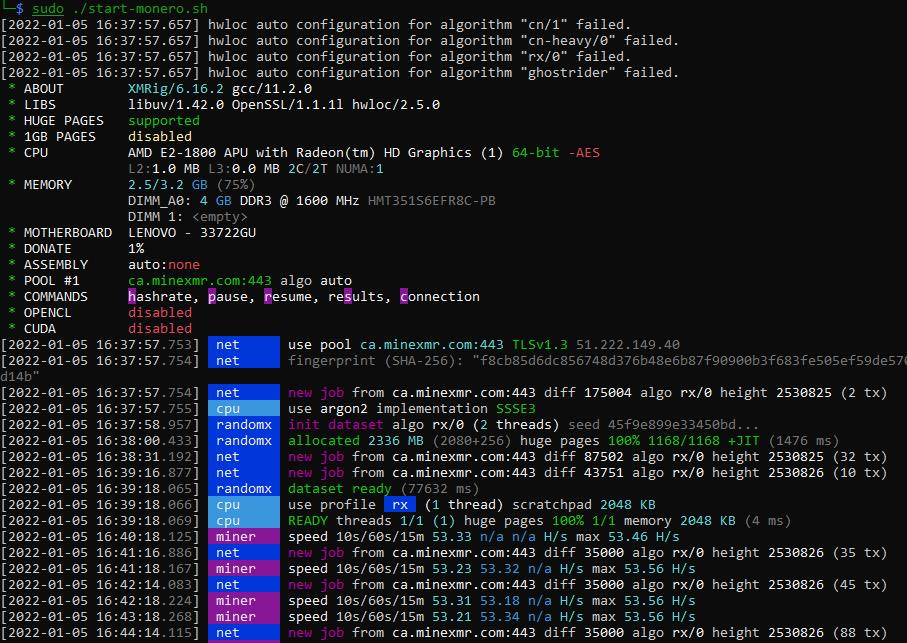
After following the above instructions, and launching the XMRig command line application, I could see my little old Lenovo ThinkPad sitting there mining Monero.
XMRig Application
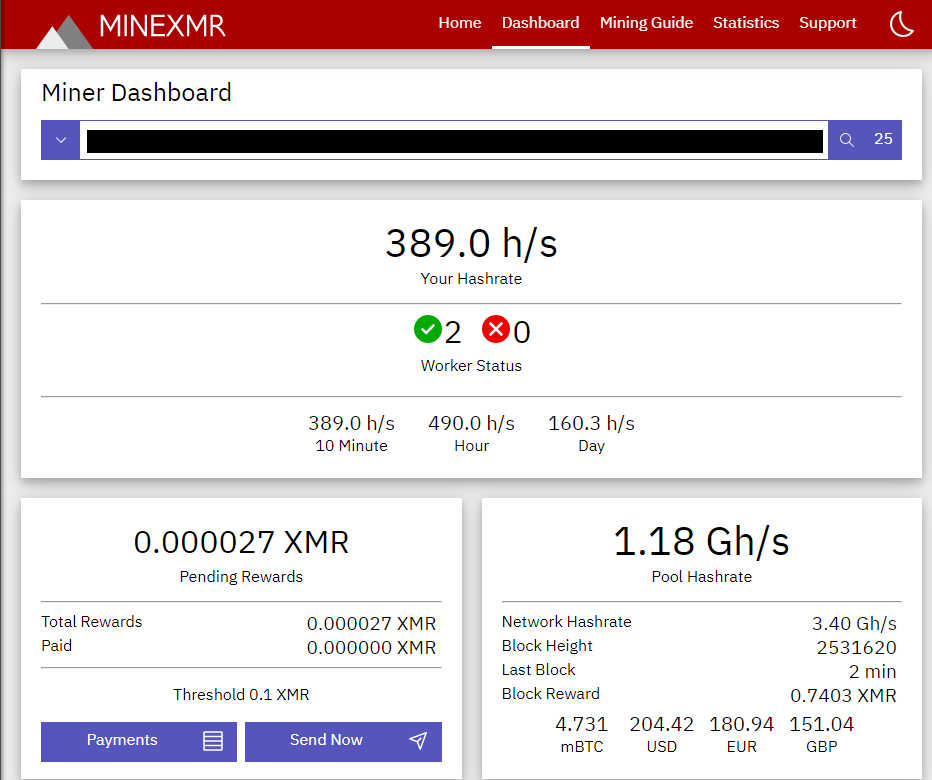
After letting this run for about 5-10 minutes I could also start to see the performance of my Lenovo as part of the mining pool on minexmr.com (this is the mining pool I selected). This was at about 5pm in the evening, so I left it for the night to see how it was doing. When I checked the following morning it showed that I has mined 0.000011 Monero or roughly 0.0022 USD after 16 hours. It was going to take a lifetime to make any real money at this rate so I added a second laptop to my mining power.
The next laptop was an HP Probook 4440s with 8GB RAM but this had Windows 8 installed on it, so I formatted the hard drive and installed Linux Ubuntu Server on the bare metal of the laptop. The installation of Ubuntu Server and setup of XMRig again roughly took an hour and there I was mining Monero to the same wallet address but now using 2 workers to do the mining as shown on the MineXMR Dashboard.
MineXRM – Active Workers
I let this run for about the next 8 hours with my 2 laptops mining and below is the MineXMR Dashboard for my workers. So in about 12 hours of mining with my Lenovo, and 8 hours mining with my HP ProBook I have mined roughly 0.000027 Monero worth 0.0055 USD. That’s right just over ½ of 1 penny.
My intent is to let this mine for roughly a month, while adding other hardware to the worker processing power, and see if this is actually profitable. Mind you I have not taken into consideration my hydro costs, but even at this point I can assume I am already at a loss since I only mined ½ penny in a day, which at this rate is estimated to be about $0.15 after a month a mining. Either way, let’s see how this goes, and I’ll provide regular updates as the month progresses or other significant events occur.
Based on the steps in the previous posts, in my situation I’m targeting to mine 4-6 HNT per month, and found that the popular and successful miners in my area are the Bobcat Helium miner using a 6-8dBi antenna so this is what I ordered from Helium Deploy (a Canadian reseller of Helium miners and other accessories). Mind you I am still waiting to receive confirmation that my order has been shipped (which should be in the next week or so), as I ordered this the last week of November and estimated delivery was within 4-6 weeks. So now I am preparing for the network setup, miner placement, and antenna installation within my house.
Throughout my research the number one way to get the best performance of your miner is to get your antenna up as high as you can. Considering it’s currently winter in Canada, so there is no chance of me crawling up on my roof to install an external antenna, the best option for me to start would be in the window of a room on the second floor, and work towards putting up an external antenna in the summertime as outlined below.
Installation Phase #1
The first stage of my installation plan is to simply install the miner and provide 4dbi antenna in a window in the second floor, and connect the Bobcat miner to my dedicated Bobcat wifi access points which are connected via Ethernet cable to the router and internet. The objective of this installation phase is simply to test the hardware, create the helium accounts, wallets and other setups, and get everything setup and working. This will also establish the performance and profit baseline, without purchasing additional hardware.
In my situation placing the Bobcat antenna by the second floor sounds great, but the problem is I have a huge metal awning that covers most of my window, similar to the below. So I have no idea how this will impact the signal strength or performance, in some cases I heard that metal close to your antenna can increase your signal strength, while other say the complete opposite. I’m interested to see how this turns out, and where the helium witnesses are that see me when I get it up and running. Unfortunately, all windows in the second floor have the same style awnings so I cannot simply move it to another room. So the next best solution is to move it into the attic.
Please Note:In the drawings provided I have a second independent wifi access point dedicated to the Helium miner. The reason for this is that I want to segregate and restrict helium related traffic, with my other internal and personal internet and local network connectivity.
Installation Phase #2
The mid-term plan is to upgrade the provided antenna with the 6dBi one I purchased, and place this in the attic. I believe with moving the antenna to the attic, the antenna signal would be on top of the metal awning, so this should enhance performance, and with the antenna upgrade this would put me inline with the other successful miners in my area.
Unfortunately with moving the antenna this would require a longer antenna cable (such as RG58 Coaxial Cable or LMR400 and roughly 20-30 ft), and some brackets or hangers to help with the cable management as it goes up the wall and into the attic. Something like the below would work for my situation and is around $30 CAD on Amazon. For the hangers I am just thinking at this point to just use dollar store peel and stick hangers, or finishing nails.
RG58 Coaxial Cable
Now that we will have a cable in the attic we will need to rig up and mount the antenna to something. There are a two options here, the first is to just look around my garage and try to build some type of mount, or purchase one. In either solution the pole would need to be able support a 3 foot pole (attic height), and also be able to support itself over the exposed ceiling joists in my attic. This would require some type of base like a small piece of plywood and from there the homemade or purchase mast would need to mount and screw into this for support.
Antenna Mast
Suitable masts are available for around $25 such as the one above on Amazon. As my longer term plan for the installation is to move this outside when the weather is better. I would like to use the same antenna mast for the attic install as well the external installation so I am taking this into consideration when selecting a suitable mast for both.
Installation Phase #3
The longer term goal is to have the Helium antenna installed above the peak of my roof at the back of my house. This would roughly put my antenna height at ~10+ metres, one of the highest hotspots in my area, and also would be able to connect the bobcat miner directly to my internet connection through Ethernet as opposed to wifi. This installation will be a more difficult installation as I would need to attach an antenna mast to the peak of my house then run a ground wire (via a lightning arrestor) to a grounding rod, and also the antenna cable (RG58 Coaxial Cable or LMR400) to the demarcation point of all my telco equipment which is in the basement of the house.
To do the above installation again we will need to go shopping and pickup a few necessary pieces of hardware.
From what I have seen the the lightening arrestor is around $30 CAD, the 75 feet of RG58 cable is around $65 CAD, the grounding cable is around $40 CAD, the grounding rod is around $50 CAD, plus additional random bolts and brackets $20 CAD. In total to mount my external antenna would cost an additional $200 CAD for parts and equipment.
I am looking forward to receiving my Helium miners and setting it up as described above to see how close and accurate my initial planning and research was. The good news is that I received an update regarding my order and the delivery dates for my Helium miner and antenna, and I am expected to receive this sometime next week. I’ll provide updates and additional blog posts when I am going through the setup and installation process to continue to document my Helium Mining journey.
Check out the other posts in my “So I ordered a Helium Miner” Blog series:
When I decided to get into helium mining, obviously my first question was, when would I see a Return on Investment (ROI)? Considering all the components I needed (i.e. miner, antenna, cabling, other mounting hardware) was roughly between $1000 – $1500 CAD I would be paying out up-front. Knowing this, if I could make at least $100 a month for one year I would be fine with that, now just need to figure out how much helium miners are making currently in my area.
Luckily we are able to answer the questions below in order to somewhat loosely estimate how successful you would be, and suggest equipment that works well in your neighbourhood.
How saturated is my neighbourhood with Helium Miners?
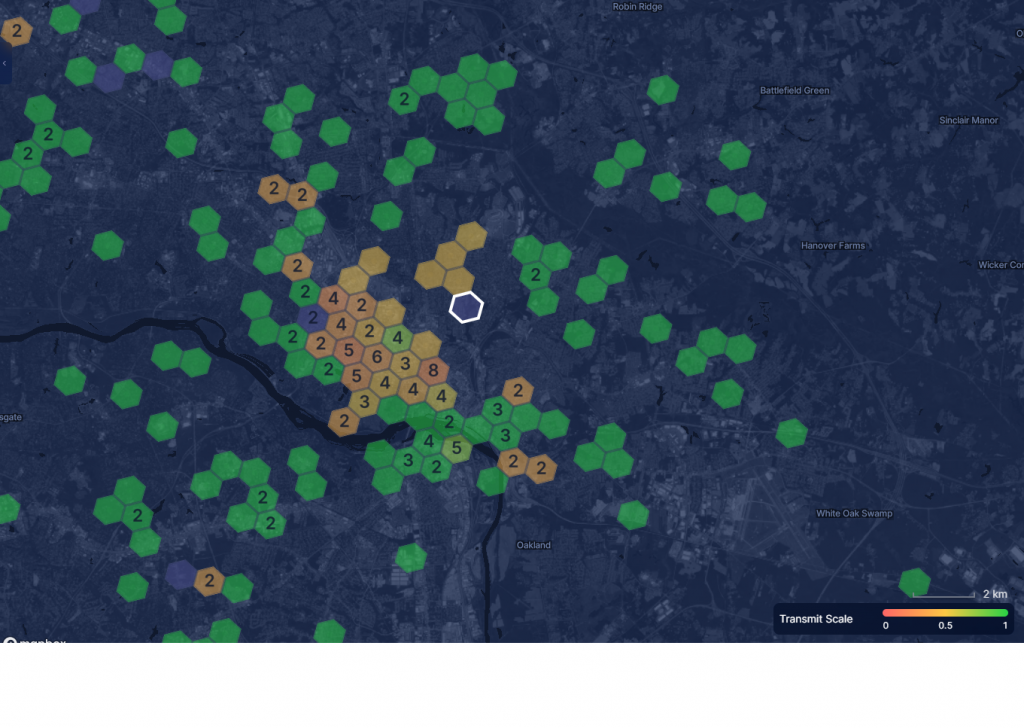
There needs to be a good balance of miners in a neighbourhood, so in some cases more is good, in others more is not good. To get an understanding of the current Helium network and where the services is available, Helium provides an online Helium Network Explorer map to help you as shown in the example below.
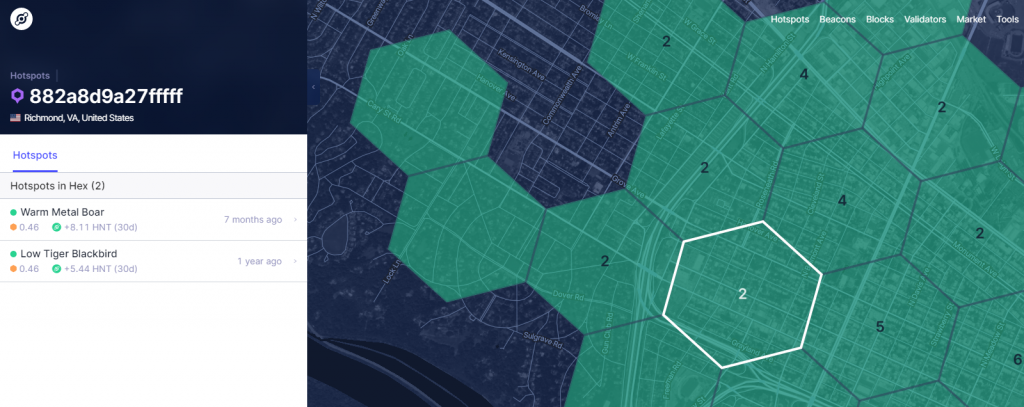
This is the Helium map of a random city, but shows nicely the saturation of mining devices. As per the map, if you are placing your miner in a green area that would be more beneficial, as the orange and red area’s with 5 and 6 other miners in the area would not be as profitable (more on this below). These hexagons do take up a large area and the ideal distance between miners is roughly 300 meters.
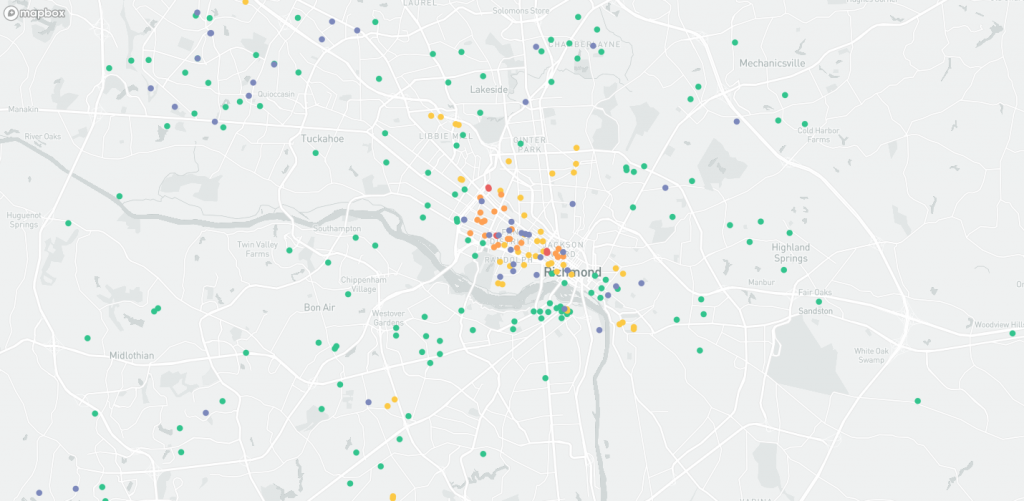
If there are multiple miners in a hexagon, it may be possible that they are spread enough apart to prevent clustering and congestion. To see this we will need to use another website that will show the location of the miner installations as shown below using the website HotSpotty. Shown below is the same location as shown using the Helium Explorer map (above), except with HotSpotty it shows the actual street location.
Using these 2 websites you should be able to get a good feel for if your area could support another miner, and how close your neighbouring miners are. In my case I found there was already 1 other miner in my hex, but we were literally on complete opposites of the hexagon, and spaced away from other miners in other hexes fairly well. Based on this I believe I have a half decent chance to make at least some HNT.
What are other Helium miners making in my neighbourhood?
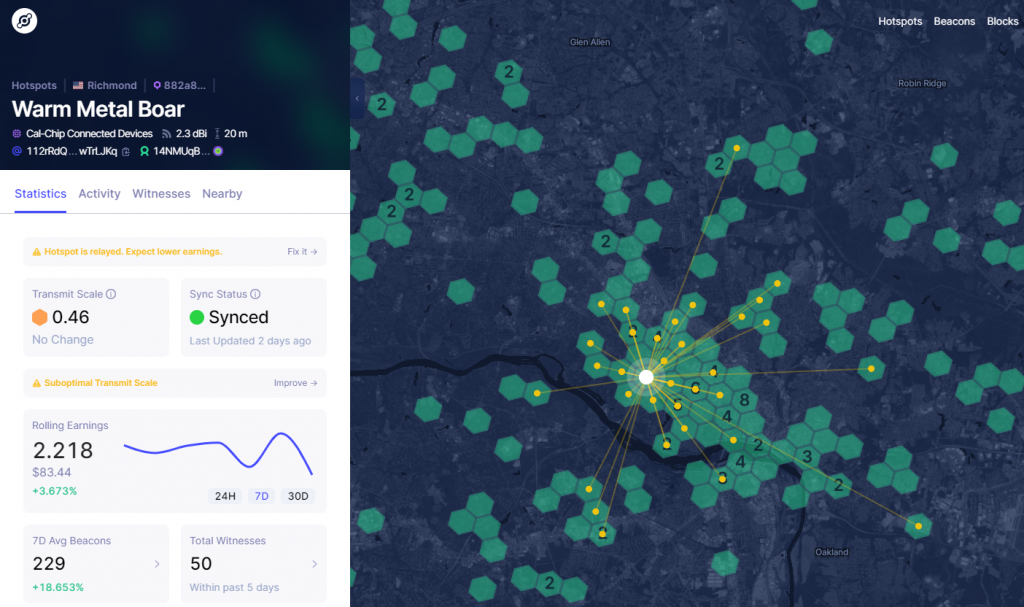
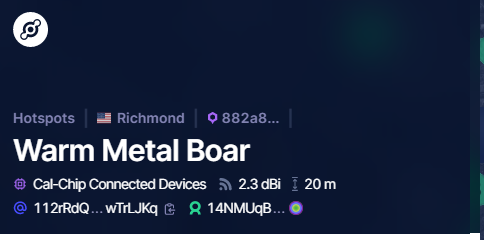
Now that you have a feel for where your neighbouring miners are, you can actually see how these are performing and how profitable they are. The Helium Explorer Map provide this information and is quite handy for estimating your potential profits. By clicking on a hexagon it will show you a list of miners in that area, and by looking at this it appears that “Warm Metal Boar” has made 8.11 $HNT in the past 30 days. At roughly $40/HNT (at the time of writing this), that $300 -$325 – not bad, I’d certainly be happy with this.
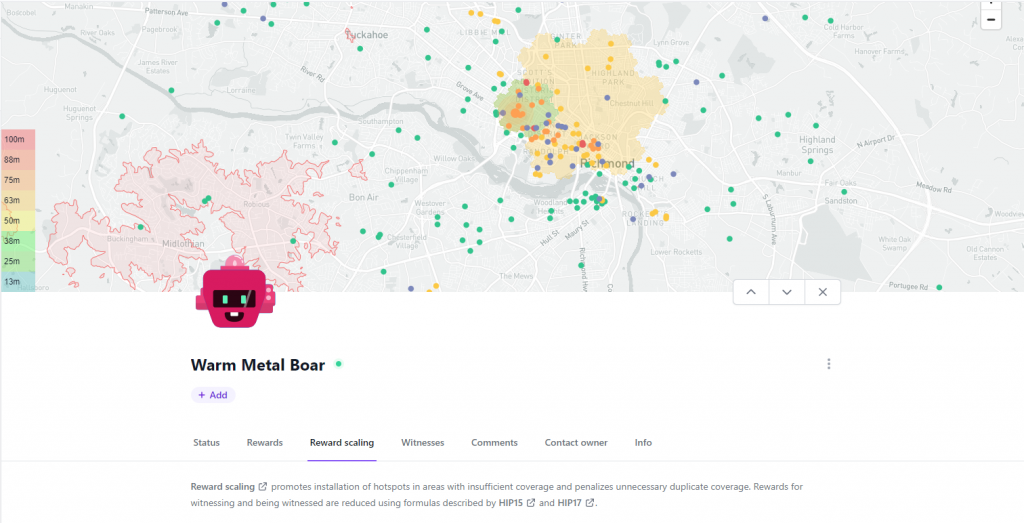
Looking at “Warm Metal Boar” a little closer we can drill down into their performance, reach, and spec’s.
HotSpotty provides this information as well along with some other data points.
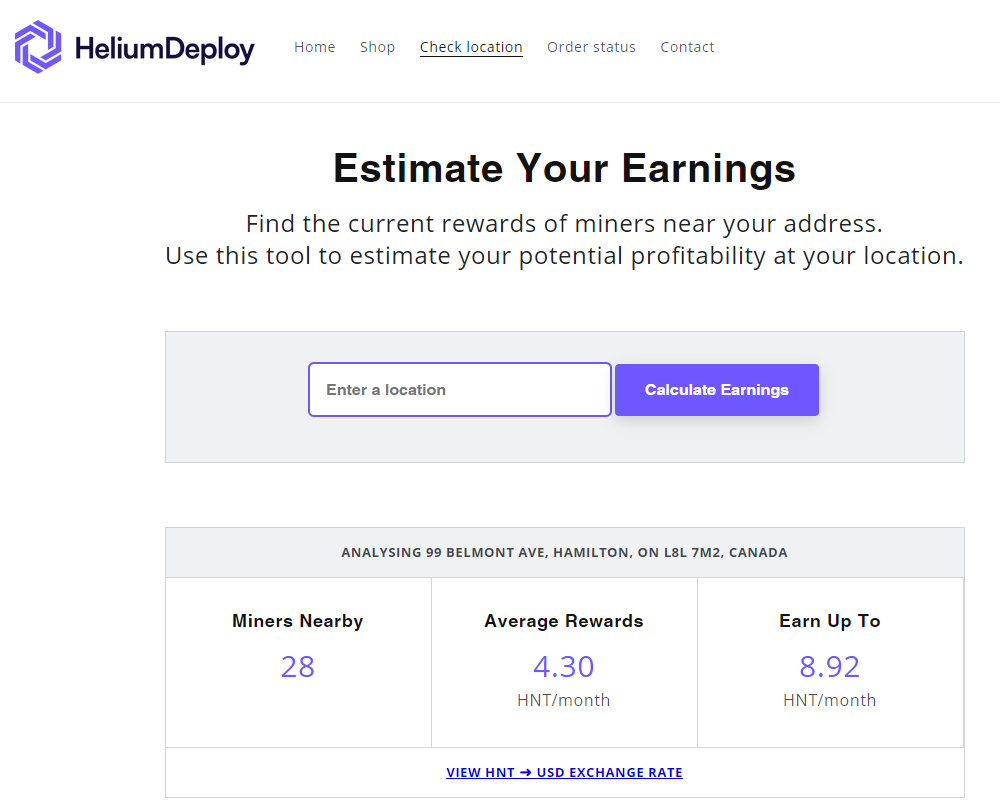
When I was trying to estimate my profit based on my neighbours I went through all the miners in my hexagon, as well as my neighbouring hexagons too see how much they have been making. In my case there is roughly 14 Helium miners in my and surrounding hex’s. Earnings for these miners range between 2 – 8 $HNT/month. In my case, if I was about to make ~5 HNT/month that would mean my ROI would be roughly within 6 – 8 months. This was also confirmed using a profit estimator I found online thanks to the Helium Deploy Team, and can be found here.
Please note:When using online profit estimating tools always assume the numbers presented to you are best case scenario. When using these types of tools I always target for roughly 60% of the data provided by these tools.
What Helium mining equipment are my neighbouring miners using?
In order to push to make more towards the higher end of that 2-8 HNT/month mentioned above we need to have appropriate equipment for your area. The best way that I found to do this was to use the Helium Explorer map again and look at the miners in your area.
As shown above we are using the “Warm Metal Boar” hotspot again, we see some interesting data that provides us with some insight on this setup. This tells us that the antenna is 20 meters in the sky, they are using a 2.3 dBi antenna, and is using a Cal-Chip miner.
In my case, again I looked at all the hotspots in my area, comparing the setups of the higher earning hotspots. What I found was bobcat miners and 5.8 dBi antennas were performing the best and providing the most profit. I even took this a step further, and located my neighbour hotspots on Hotspotty, and drove around those area’s to try to find them to see if they were using an external antenna as these should be visible from the road and not invading and privacy. Based on this I can assume that a Bobcat Miner with a 5.8 dBi antenna, externally mounted should be close to an ideal setup that provides the best return.
With the above steps and information, by now you should have a pretty good indication for the start-up costs, and estimated returns and if Helium mining is for you. For myself I’m estimating the upfront costs are around $1400 CAD, but I am estimating to make $200 – $250/month. With these numbers I am looking to start turning a profit after 6-7 months. For me, this is within my comfort zone, as I am in this for the long term and am not expecting to go from rags to riches within a short period of time. In addition, I am technically incline to mount antenna’s and equipment, and also configuring appliances and network connectivity in order to maintain performance of your miner.
If you are not prepared to consistently monitor, maintain and otherwise troubleshoot your miners performance on a daily basis this will significantly impact your profitability. Also keep in mind, you still need to plan out where you will place your miner and antenna, and how you are going to connect everything together which may also require additional hardware, (i.e. mounting brackets, etc…) that will contribute to your helium maintenance costs, which we will get into more in the next post.
Check out the other posts in my “So I ordered a Helium Miner” Blog series:
So as the title of this blog post says, “So I ordered a Helium Miner”…..
What is Helium? and what is a Helium miner you might ask? Helium is a public blockchain, developed to incentivize everyday people to assist in the creation and support of a decentralized wireless network, known as “Helium – the People-Powered Network“. In essence, contributors to the Helium network provide their own equipment and devices known as LoRaWAN hotspots (miners), which connects to other LoRaWAN hotspots (miners) in your local area to build out a mesh style network, and in return are paid in the $HNT (Helium) crypto-currency (which is currently valued at around $40 CAD/$HNT).
What is a Helium Miner?
Helium Miner is a device (think like your internet modem), that plugs into your home internet, and also to an antenna which operates on a low level frequency (~915 Mhz), and connects to other miners/antennas in your area and creates an area of coverage or support for the Helium network. This network is used to connect a wide variety of IoT style devices to a network with mass coverage and resiliency in order to send and receive sensor and or other transaction data for example. These miners are primarily used to create the network, but they are also used to transfer data, and complete Proof-of-Coverage and witness tests, which help to validate and support the quality and integrity of the network.
How Much Do Helium Miners Make?
In short, well….. it depends. There are many, many, many factors that contribute to the profitability of Helium mining, and it’s a constant shifting landscape. I’ve heard of people making anywhere from nothing / nadda, zilch to consistently making thousands of dollars per month, but it seem somewhere between 1-6 months is the average ROI. There are also other ways to increase the value of the Helium $HNT that you mine, for example there is the price appreciate of the Helium crypto-currency ($HNT), can Stake/Earn your mined $HNT to earn interest or a premium, or you can roll your $HNT earnings into another more profitable crypto-currency like Bitcoin or Etherium, or something speculation coins like Doge or Shiba Inu. For me, if I break even within 1-6 months, great, if it takes longer than that I’m fine with that as well as this is not a short term play for me.
What Affects the Profitability of a Helium Miner
As mentioned above there are many things that can affect the profitability of a Helium Miner, and what works for me may or may not work for you. I have seen people with very simple setups that are making a good consistent income with the default setup and nothing more special than that, and others with fancy enhancements that should work perfectly (on paper) yet produce sub-par results. I believe Helium Mining profitability has 4 main components – Mining hardware and connectivity, antenna placement, physical location, and the Helium Software.
Hardware and Connectivity
As with any electronic device you own beit a cell phone, computer, tablet, etc…. if you have good hardware you will have a good experience, yet if not you are asking for trouble or other ongoing problems resulting in an unpleasant experience. So in short, make sure you are using quality hardware and equipment. From a mining perspective, there are a few hardware and connectivity components that support your miner and mining experience:
Miner
There are many different manufacturers of Helium miners available and selling at various price points. I have done quite a bit of research on helium miners and to be honest, most have some number of negative comments (of course – everything does). These comments vary from performance and profitability to usability and delivery dates, yet the make/model that seems to stand as the best is the Bobcat 300. This is based on my own research (Google, FaceBook Helium Groups, YouTube), and I do not receive any incentive for saying this. From what I have seen and read about this the Bobcat 300 is the most efficient and self-supporting miner on the market with one exception that this model only has 1GB of RAM. The 1GB of RAM is on the low side which could result in lag and performance when syncing with the greater Helium network.
Please note: Personally, I have not used the Bobcat 300 or any other miner at the time of writing this. I have Bobcat 300 on order (not received or setup), and I have not used any other hardware to compare. The above is based on research I have done, and progress and updates will be provided in subsequence Blogs. Updates will be provided in subsequent blogs.
Antenna
Ahh yes…. the Antenna. The antenna is the most important component of your setup, yet finding the correct Antenna for your situation is a science all on its own. The main components of this are the Antenna’s Strength, as well as its placement (to be discussed below). Antenna Strength is measured in dbi’s, and the factory antenna that comes with most devices is around a 4 dbi antenna. I have seen some good success with a 4dbi antenna in terms of profit, but you may need to do some enhancement and upgrades to your antenna to get a further reach and connect to other antennas on the helium network. Everyone is in their own unique situation and there is no one size fits all for an antenna, so you need to play around with a few different ones to see what works best for you. In my case I believe a 5.8 dbi external antenna will work out best for me which I will describe more in detail below.
Antenna Cable
The Antenna will now need to connect to the miner, and this is done through a cable known as an SMA cable (think a small version of a coax cable), that connects to the antenna input port on the miner. In order to get the best performance this SMA cable needs to be no longer then required (shorter is better), and has the least amount of signal loss as possible. From what I have found the best cable to use is known as an SMA LMR 400 cable. This type of cable comes in a variety of lengths and is recommended as there is lower dbi loss. It is best to plan out your mining setup, and placement in order to determine how long of SMA cable will need to be (more details about placement below). In addition, as there may be signal loss this can be compensated by using a stronger/higher dbi antenna, but again everyone’s situation will be different for everyone, and may take some trial and error to find the best configuration that works for you.
Network Connectivity
Next the physical miner device will need to connect to an internet connection. This may be difficult for some as, most internet demarcation points (point where your internet comes into the house), are towards the lower half of your house, and since the miner is antenna based, it needs to be high up. In most houses, Wi-Fi is typically the solution and will work, but there are some limitations and restraints with working with Wi-Fi (in general), that may impact the performance of your miner and in turn your rewards.
Wired Ethernet
The best method would be for a physical Ethernet cable to be plugged directly into your miner and into your home internet connection or router. With a physical ethernet cable since you have a direct and hard wired connection to your internet, you will get lower latency, more stable connections, and higher speeds on your device’s internet connection which means that you will be able to communicate with the Helium network and blockchain faster and increase your miners performance. The concern with this method is that you will need to run an Ethernet cable from your switch/router/modem then to your miner. If your house is not already pre-wired for wired internet, wiring it is not difficult if the walls and floors are open, as you are able to fish the cables through your walls. If you are not able to easily fish your cables and need to cut into drywall, it may be best to look at the other alternatives mentioned below.
Wired Ethernet – Power over Internet (PoE)
On a side, if you are using a wired internet connection, you are also able to leverage the ethernet cable as a power cable as well resulting in only one physical wire running to your mining device. This is done through a technology known as Power-over-Ethernet (PoE). In short, this is a device that plugs into a power outlet and has 2 Ethernet ports, 1 for input (no-PoE), and 1 for output (with PoE). At the miners end the PoE ethernet cable will be connected to another device that splits the power a power connection, and the data to an ethernet connection. Once both the power and ethernet have been connected to the miner it will power up and be ready to go.
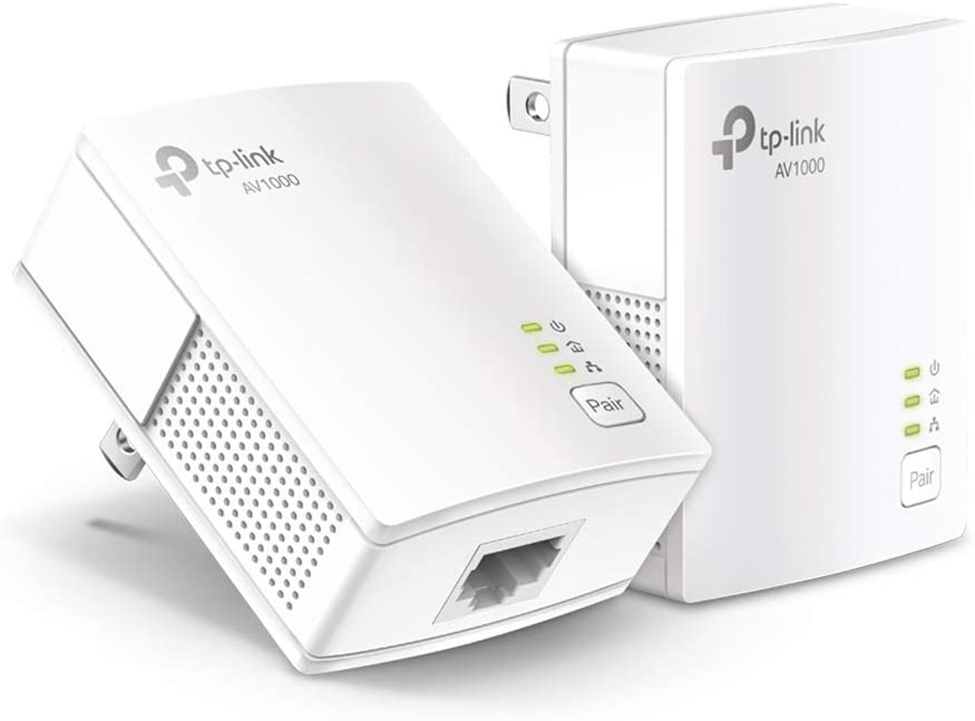
PowerLine Networking
If you are not able to use a physical ethernet cable, a close alternate is to use PowerLine Networking to leverage your home power outlets for networking. PowerLine Networking are similar to the PoE device mentioned above where it plugs into the power outlet and has ethernet ports as well. The difference here is once at least 2 of these devices have been plugged in and ethernet cables have been connected (from your internet source and destination), your homes existing electrical wiring to establish a network connection between the 2 PowerLine Networking devices. With this type of networking, while it is not a full wired connection, you still receive most of the benefits, yet will experience a slight degradation in speed (compared to a full wired connection) but either way this would still be faster and more stable of a connection then on Wi-Fi.
Wireless Networking (Wi-Fi):
Wireless networking should be your last resort for networking not just for a Helium Miner but any home device that connects to the internet. While Wi-Fi has its benefits, there are 3 main factors that contributes to its performance.
Wireless Channel : Wireless internet operates in a range that consists of a series of channels. If you are in an area where many of your neighbours are using the same channel this will create congestion and noise on the channel that your wireless controller will need to sort through.
Number of Connected Wireless devices : Wireless controllers can support many connected devices at a single time, but there are limitations to how many of these devices the wireless controller can speak with at a single time. If there are a few devices one a wireless network this would barely be noticeable, yet if you have multiple devices streaming YouTube or Netflix, and someone on a different device tries to go browse a webpage, loading times of the webpage may be delayed as your wireless controller is working hard to ensure no disruption in the video streaming. This can create what appears to be a bottleneck in your internet speeds. There are many different makes and models of wireless controllers leveraging a variety of wireless technologies (i.e. Multiple-In, Multiple-Out – MIMO) that can help address this, yet these devices can be costly.
Signal Degradation/Loss: Another common issue with wireless internet that affects your wireless speed is the degradation in signal over distance due to the physical surfaces it has to travel through, as well as electrical emanations from other devices and appliances in your home. This could include things like the type and number of layers of paint on your walls, what your walls are made of (plaster and rock lathe / drywall), even appliances (such as a fridge, microwave, cordless phone) can affect the signal quality of your home wireless.
Antenna Placement
The short answer to the question “Where should I place my Antenna?” is simple, outside and as high as possible. The idea here is that you want your signal to transmit over your neighbourhood and not through it. If you have an existing television antenna or satellite mount on your home these would be the best and easiest to use. If you do mount your antenna outside you will need to take into consideration where your miner will be located and how you will wire everything everything up. This may include drilling a hole in the side of your house in order to get the SMA or ethernet cable through and connect to your miner or home internet. Depending on your comfort level with ladders and heights this would be the best solution, but is not for everyone, and keep in mind any antenna installed on the exterior of your house, must be installed and grounded correctly. Otherwise, installing your antenna in your attic, or the top floor of your house and close to a windows will also work as well.
Physical Location
Your physical location is another contributing factor to your success in Helium Mining. Depending on the elevation of your area this may affect the distance your signal can carry. If your elevation is higher up, similar to the antenna location your signal will travel further, as opposed to if your location is in a valley or otherwise is at a lower elevation your coverage distance will be limited as the surrounding terrain is blocking your signal.
Helium Network Coverage and Saturation
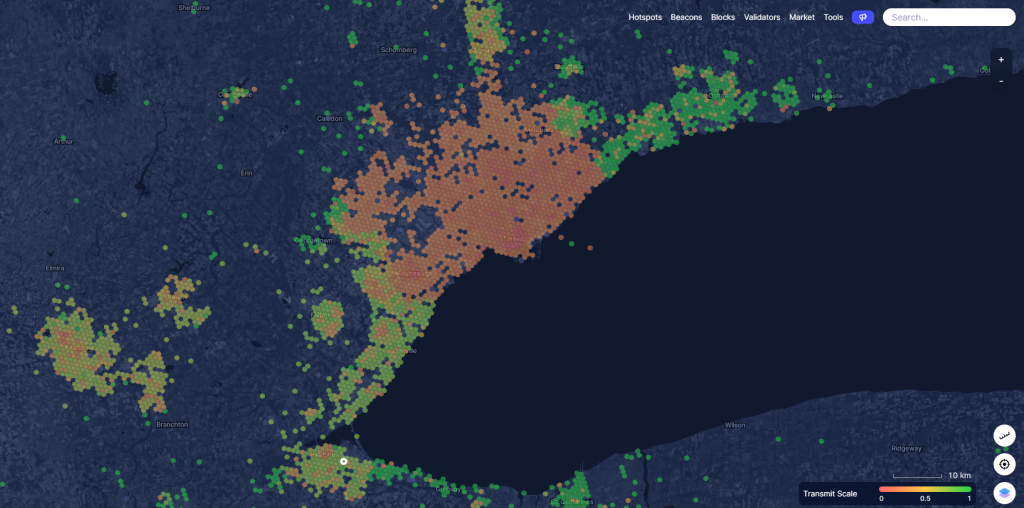
Last but not least is the Helium network coverage and saturation in your area. Below is a Network coverage map from the Helium Explorer that shows all miners and their transmit scale. As you can see toward the top of the map is a heavily saturated area for Helium Miners, while this is good for the network, this is not beneficial for someone supporting the network in return for rewards. Area’s that are on the greener side have less miners in the area and may be more profitable. Area’s with no colour do not have any miners in the area, which you may think would be a good thing as if you are the only miner in the area then you will receive all the rewards. As these uncoloured area’s are typically found in rural area’s in order for this to be profitable you will still need to be within distance to communicate with other miners on the network, and also there would need to IoT devices in the area that uses the Helium network. On the other hand if you are in a rural area and near a farm that is using agricultural IoT Helium Device this could be very profitable.
Helium Explorer Map – Transmit Scale
As mentioned at the beginning of this post, I have only ordered the Bobcat Helium miner and have not actually received nor installed it at this time. This post was only intended to provide a summary of tips and other information that I have found to determine if mining for me would be possible and/or profitable. Follow-up posts will be done to describe how I estimate my profitability, determine my hardware and document my setup and troubleshooting steps. Please stayed tuned for updates.
Check out the other posts in my “So I ordered a Helium Miner” Blog series:
I recently completed the Zac Hartley’s Stock Market Fundamentals course which is hosted on SkillShare. For those of you that are not aware, Zac Hartley is a Canadian YouTuber who frequently posts about his views and experiences in the stock markets, what stocks he will be trading in the coming weeks, investment suggestions (not advise), as well as interview’s with CEO’s of the organizations he is interested and/or invested in. As part of his entrepreneur ventures, Zac created a Stock Market Fundamentals Course hosted on SkillShare. All and all the course was a great experience, the content was presented well and covered a wide variety of topics, all of which are very useful no matter what trading and investing style. Best part was I completed this course for completely free.
If you watch Zac’s video’s anytime he mentions his course, he mentions that it is hosted on SkillShare (an online platform for learning and training courses) which offers a free trial for new members, and if you can complete the course within this free trial period (and cancel once you complete it) you get the course for free. In order to sign-up for SkillShare account you do need to provide a credit card at the time of sign-up, and after the 1 first month the cost is $214/CAD annually. The sign-up process was fairly quick, and the SkillShare platform is very user-friend, quick, responsive, and easy to use. If I needed another course I’d definitely use this platform again.
The course is ~10hrs in length and covers everything from stock market background and history, investments and trading instruments, how trades and markets work (behind the scenes), order types, as well as selecting and analyzing potential stocks for trading. It took me 2 days to complete the course, but to expedite this I was playing the videos at 125% speed. As the quality of the audio and video was really good, at this increased speed, the content was still easily heard and understood. I also noticed that during the course videos there was an indicator of how many other people were participating and during my time there was between 300-315 other people taking the course at the same time, which goes to show the popularity of this course.
Overall, the Zac Hartley’s Stock Market Fundamentals course was a great introduction to the financial market, and I would recommend this to anyone new to stock trading or investing. The entire experience was enjoyable and seamless including the content as well as the learning platform SkillShare. For those new to the Stock Market this is excellent course to start you off on your path of success in the markets.
Cannabis has been legal in Canada for the past number of years, and since then there has been significant growth in the number of companies covering all aspects of the supply chain. This includes but is not limited to growers, distributors, retail outlets, producers (infused products), and even pharmaceuticals. All of this aspects of the supply chain have one main thing in common which is they are all dependent on one thing and that is they all need the actual cannabis.
In the early days of legalization growers were producing as quickly as possible, and some were found cutting corners to increase grow capacity but found ended up in non-compliance with Health Canada regulations over non-regulated grow rooms ( see: Pelham cannabis grower knocked by Health Canada ). Today according to the Government of Canada there are currently 733 licensed companies for the sale, cultivation, and processing of Plants/Seeds, or Dried/Fresh Cannabis, while in 2015 there were 22. That’s a 3300% growth in 6 years.
With this rapid growth it is hard to believe the long term industry can sustainable this. In time it is likely we will see consolidation in the market, some company will be bought out, some will go under, while others will prosper. Regardless, I am long-term bearish on the industry and will invest in it for the following 3 reaasons.
Retail Saturation
Where I live, there is almost literally a retail store on every street corner. To put this into perspective, within a 3 block radius from my house there are 9 Tim Horton’s, and 13 retail cannabis outlets. There is only so many people that actually use cannabis (not like there is more cannabis users then coffee drinkers), but I certainly do not think the demand and market are at the point where we need one on every corner. This will only lead to increased competition and lower prices.
Grow At Home
In Canada it is legal to cultivate 4 plants per household. With an average yield of 17.5oz per plant that totals roughly 70oz per for all plants. That’s like a grocery bag full of cannabis. So what is someone going to do with that much? I knew someone that grew one year and once all was said and done they said they had enough to carry. You can only smoke so much of it, maybe some cooking and baking if you are creative, or give it away, but there is literally so much you do not know what to do with.
The Underground Market
Even though cannabis is now legal in Canada, there always will be the underground market. As the underground market is not the most reputable they have one key advantage and that is, they always have the ability to undercut their competition in terms of price. If a retail store sells a half-quarter for $40 plus tax, they can always sell it for $30 – $35 (or cheaper) all in.
This is just my perspective and investing style (not financial advise), and I do recommend that everyone do their own due diligence before investing in a company.
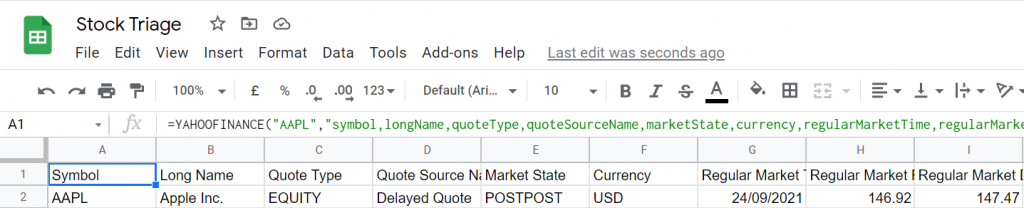
I’ve recently been looking for a tool/service that can help automate the triage process when conducting due diligence on new stocks. Ideally I wanted to build something that used Google Finance API and Google Sheets for the API look-ups then do some Excel Magic (or Google Fu in this case) to give a high level recommendation of if a stock is a good candidate for further due diligence. To my surprise Google Finance API’s only gives you a limited number of parameters to query. I preferred to use Yahoo Finance’s API, yet during my searches I found that this has been discontinued a number of years ago and is no longer publicly available. To my surprise I was lucky enough to find an “Add-on” for Google Sheets (called YAHOOFINANCE – by WebDataHub.com) that interfaced with the Yahoo Finance API to provide the data I was looking for.
Please Note: The YahooFinance Add-on by WebDataHub.com is only free for 7 days, and after that is a paid license for roughly $20/Month. Despite that the add-on is only free for 7 days, the results were beyond what I expected.
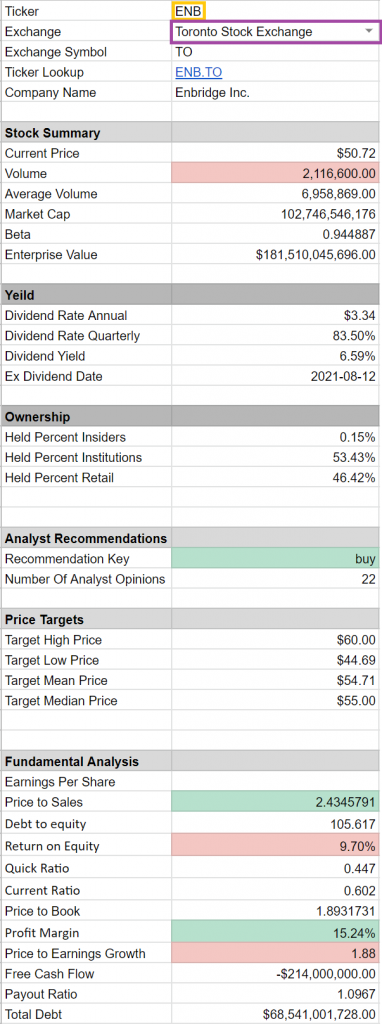
To use this you simply enter the stock ticker that you are interested in (in yellow below – in this case Enbridge), and select the Exchange from the drop down, and wait for the data to reload. This was fairly simple to do and only took roughly 2 hours to make and works great on my iphone as well.
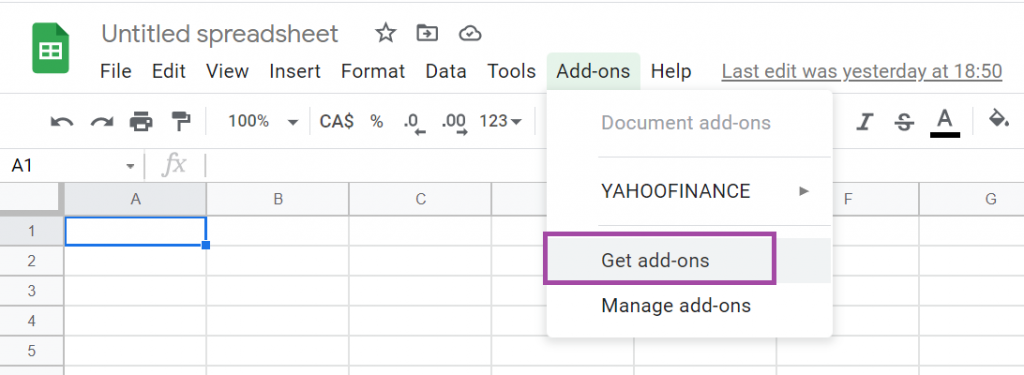
To do this first you need to install the “Add-On” for Google Sheets called “YAHOOFINANCE“.
To do this there are 2 ways.
Install the Add-on directly through Google Sheets To install the Add-on through Google Sheets simple open a new sheet and goto: Add-ons -> Get Add-ons.
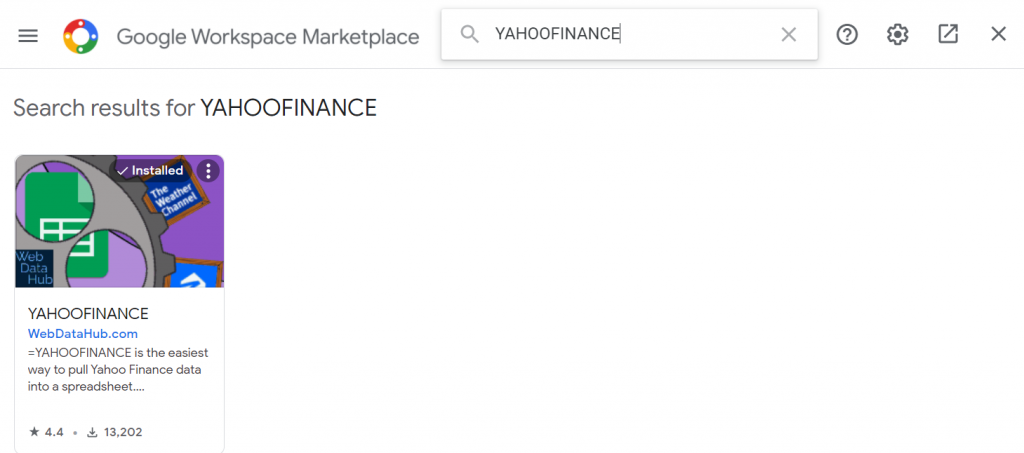
Search for YAHOOFINANCE
Select this Add-on and click the “Install” Button as shown below. The next screen will prompt you for your permission for the app to access your Google Sheet Data, Run-Third Party web content in sidebars, connect to an external service, see your email address and any other personal data that is public.
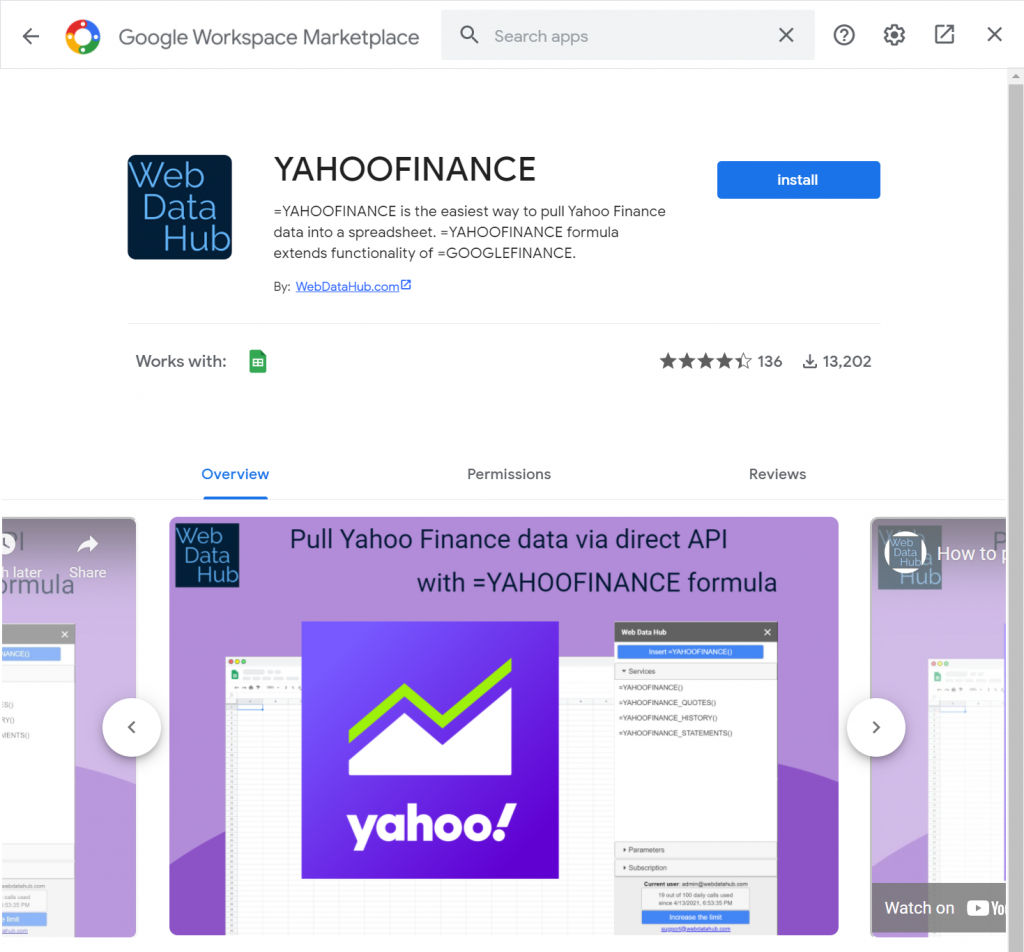
Install the Add-on Through the “Google Workspace Marketplace”
The second way to install this Add-on it by going directly to the “Google Workspace Marketplace” website by going the the following URL:
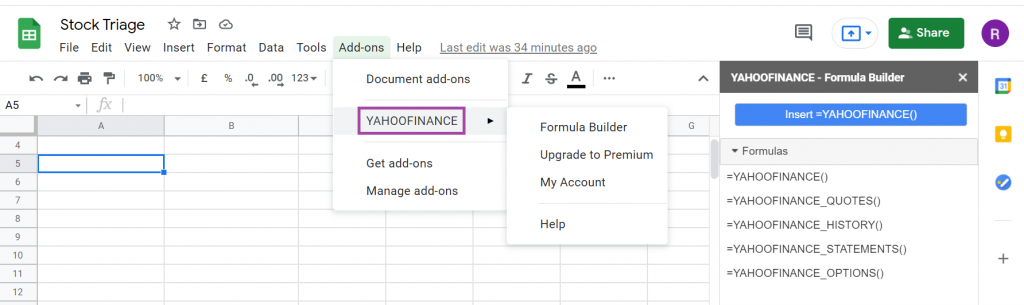
Once the Add-on has been install let’s begin by opening a new Google Sheet and create a new Worksheet called “General”, and in the first row and column goto”Add-ons” -> “YAHOOFINANCE” -> “Form Builder” and you will see a sidebar show up as shown below, and select the “YAHOOFINANCE()” Formula.
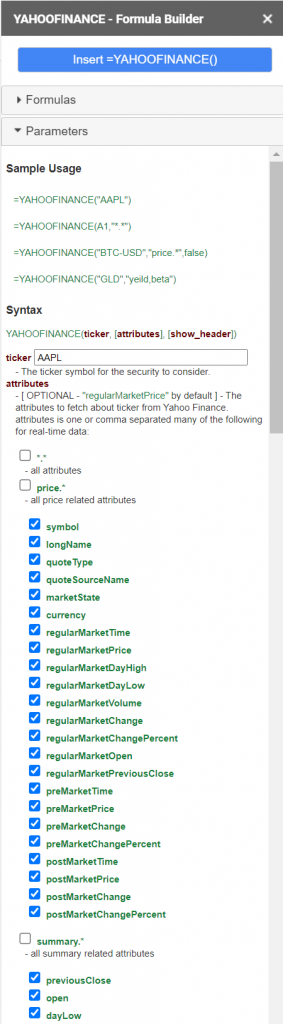
When you click on the “YAHOOFINANCE” Formula, the parameters windows will appear and show you how to use the api query and asking which of these attributes you would like to have returned (there is literally any imaginable attribute you could think of). I suggest to enable them all and then at the bottom select the “True” options for show headers. Once this has been completed click the “Insert =YAHOOFINANCE” button.
This will enter the appropriate query string in the first cell of your spreadsheet and will look something like the below. Don’t worry about this being the data for Apple, we will change that later and make is a dynamic field so you will not have to update the query every time you want to change the stock.
Once this has been done create the following new tabs:
Quotes
Statements
Options
Continue the same process as mentioned above, and for each new tab that was created, import all the YahooFinance data from the appropriate formulas within the “Add-on”. Please Note I did not use the “Statements” Formula as I found this contained duplicate data. Once this is done, you should now have 4 tabs that contain the query data.
Once that has been completed, go back to your first blank worksheet, this should be titled Sheet1 – but you can name this anything you would like such as summary, details, etc… but please not this will be difficult to change later. In cells A1:A5 enter the following:
Ticker (This is the ticker you would like to look up)
Exchange (This is the exchange that it is trading on – selected from a drop-down menu)
Exchange Symbol (This is to resolve the exchange symbol)
Ticker Lookup (This will concatenate the ticker entered above and the exchange symbol to enable to lookup)
Company Name (Looks up the full company name
Ticker Field
This is just a plain-text field with nothing fancy. Simply enter your ticker in the B1 cell.
Exchange Field
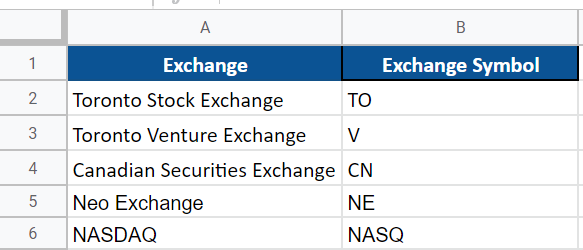
To create the drop-down menu for this create a new worksheet and name it “xLookups”, and in this tab and in the first row enter “Exchange” in A1 and “Exchange Symbol” in B1.
List the names of all the exchanges you would like to use in column A.
For the Ticker Symbols you will need to goto Yahoo Finance and lookup any stock on the exchange you are interested in. In the example below we will use Enbridge on the Toronto Stock Exchange.
You will notice that after the/quote/ in the URL, you see the ticker “ENB” followed by a period, then “TO” for the exchange. This is the convention that we will also need to use when making the Formula Builder queries dynamic. Complete this for all the exchanges that you are interested in and when you are complete you should have a table like the below in the “xLookups” worksheet.
Exchange Symbol Field
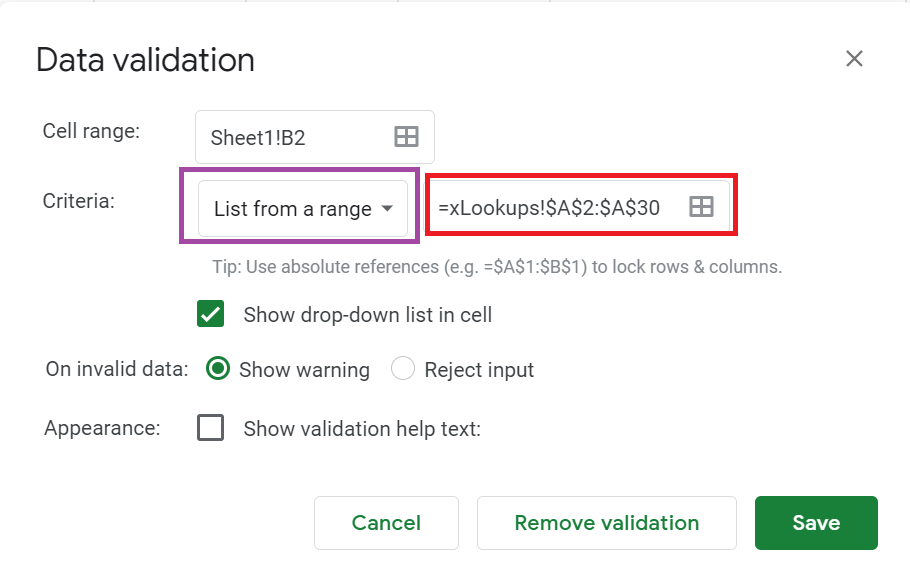
Now go back to the first tab “Sheet1” if you have not renamed it and select cell B2. Once selected right-click on the cell and select “Data Validation” from the bottom of the menu. This is where we will select the data to use for our dropdown. In the pop-up that is displayed, under Criteria select “List from a Range” and in the field beside it select the “xLookup” worksheet and select A2 to A30. This will enable you to add more exchanges in the future without having to change and code. When you click the save button this will create the dropdown arrow in cell B2 on the first tab.
Next we will need to create the vLookup that will find the exchange entered in cell B2 with the appropriate exchange symbol identified in the table created in the xLookup” worksheet. By entering the formula below this will look for the data within cell B2 on the Sheet1 worksheet, in column A2 within the xLookups worksheet, and get the second value which is the exchange symbol we want.
=vlookup(B2,xLookups!A2:B30,2,false)
Ticker Lookup
The Ticker Lookup field simply concatenates the ticker entered in Cell B1 with the exchange symbol from cell B3 in the format needed by Yahoo to query its finance data. To do this enter the following formula in cell B4.
=CONCATENATE(B1,”.”,B3)
Company Name
The purpose of this field is to just get a lookup for the full plain text company name. This data is found in the General worksheet in Cell B2. To enable this lookup, simply enter the below formula into cell B5 on Sheet1. Please note at this time it will probably display Apple as we have not changed the YAHOOFINANCE queries to be dynamic which we will do next.
=General!B2
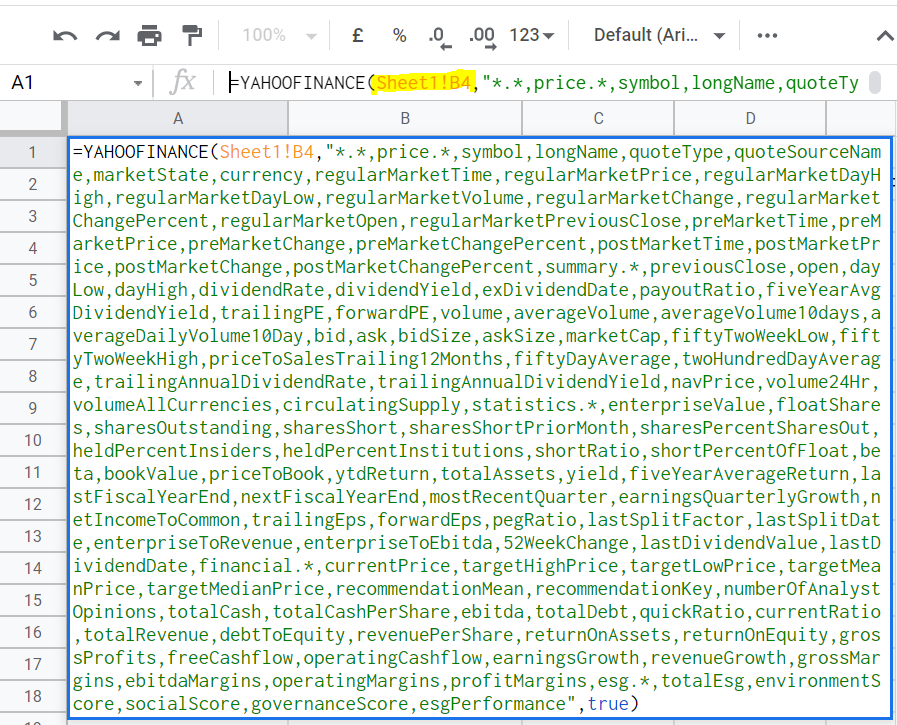
Making Dynamic Queries
Now that we have a few cells that allow us to create the appropriate ticker/symbol convention for lookups. Now all we need to do is replace the default lookups with the concatenated string in cell B4 on Sheet1. We will need to do this once for each of the 4 worksheets that does the Yahoo Financ e queries. To do this select the first cell on each sheet, and in the formula bar, you will see the YahooFinance Query. To change the formula to include the ticker and symbol from the first sheet we just need to change the hard coded “AAPL” to “Sheet1!B4” as shown below. Be careful of any quotes, or comma’s that may result in an invalid formula. Continue this change for all the other sheets.
Once this has been done go back to your first sheet “Sheet1” and play with the ticker and exchanges to ensure they work and update appropriately. As you change the ticker and symbol on the first sheet this will update the subsequent sheets with all the necessary data and more to help us with our assessment.
Summarizing the Data
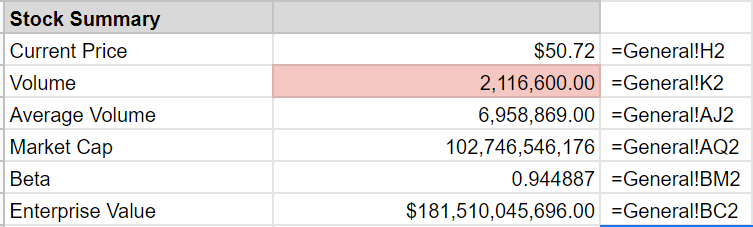
The summary of data all depends on the trader/investor and what data points they are interested in. For me I was interested in corporate details such as current stock price, volume, average volume, market cap, beta and enterprise value. This data is all found in the “General” tab and is just a simple reference to pull that data into the appropriate cells on the summary sheet.
See below for example:
Continue to pull in the data and organize as you like. I prefer working in just 2 columns and a long list as this makes it easier to use this while I am on my phone. When you are completed you should have something similar to this.
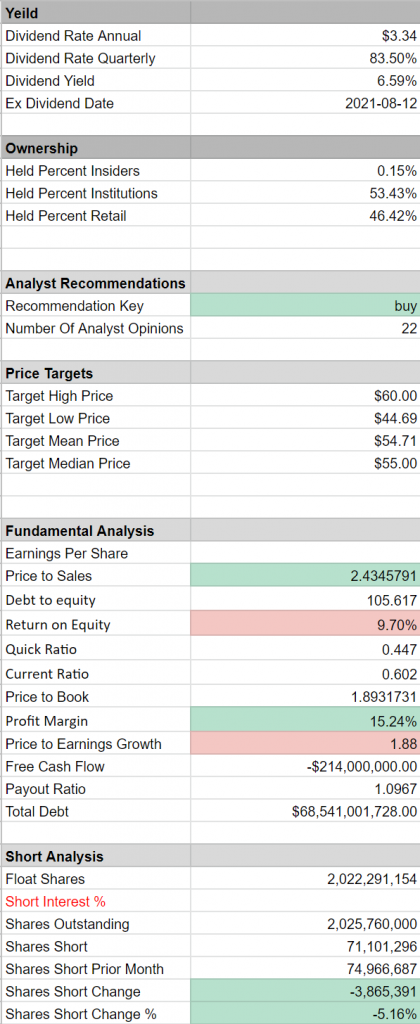
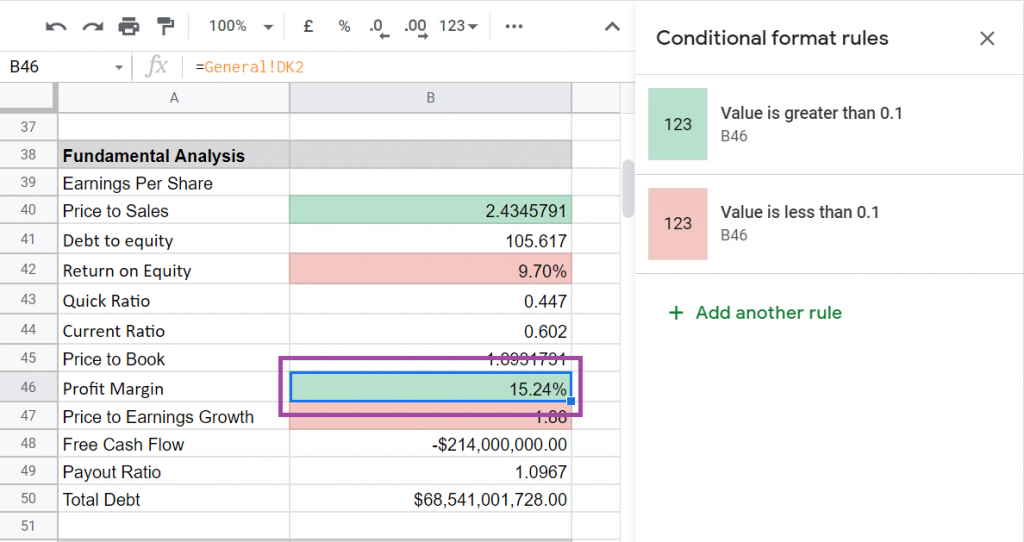
I took this a step further and also used conditional formatting (shown here as green and red highlights) to indicate a positive or negative data point. As shown below Cell B46 is looking for a profit margin which is defined as green if the value is above 10 percent, and red if below 10 percent.
These numbers are arbitrary and you will need to define what works best for you based on what you are looking for, and the more conditional formatting that you include the easier and quicker it will be to quickly analyze and assess a stock and its financials.
Part of any stock trader/investor’s job is to track their performance and profitability. There are many platforms to do this including your own brokerage accounts, yet sometimes this can be limited in terms of their features, functions and visualizations. In addition, this may be difficult for some investors and/or traders if they are using multiple brokerages and trading accounts as their portfolio are distributed and not all in one place. To aid with this I have created a simple Google Sheet that automatically looks up the current stock price using Google Finance API’s to automatically update your portfolio as shown below.
First add 2 additional tabs to the sheet by clicking the “+” button 2 additional time, then change the tab names by double clicking the tab at the bottom of the screen:
Stock Tracking (Data Entry tab)
Summary (Presentation Tab)
xLookups (used to Data Validation and sheet Lookups)
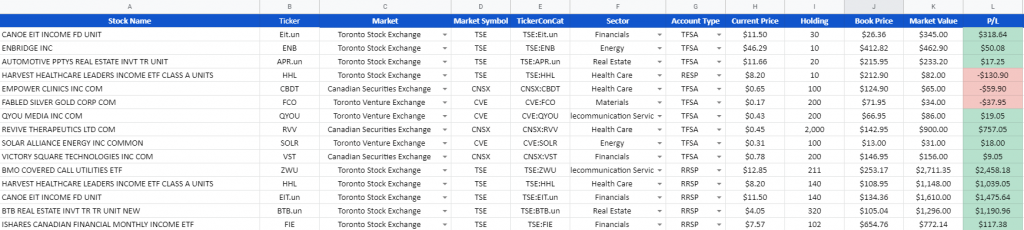
Next, go to the Sheet “Stock Tracking” and create a header row with the following Column Headings:
Stock Name (A)
Ticker (B)
Market (C)
Market Symbol (D)
TickerConCat (E)
Sector (F)
Account Type (G)
Current Price (H)
Holding (I)
Book Price (J)
Market Value (K)
P/L (L)
We will go over each of these columns shortly including what these mean and what they do.
Copy the entire header row from the “Stock Tracking” tab to the “Summary” Tab, and add a “2” ad the end of each column name. For example on the “Stock Tracking” tab you will have a column called “Stock Name”, and on the “Summary” tab you will have the same column just named “Stock Name2”. Repeat this process for all columns in the “Summary Sheet”.
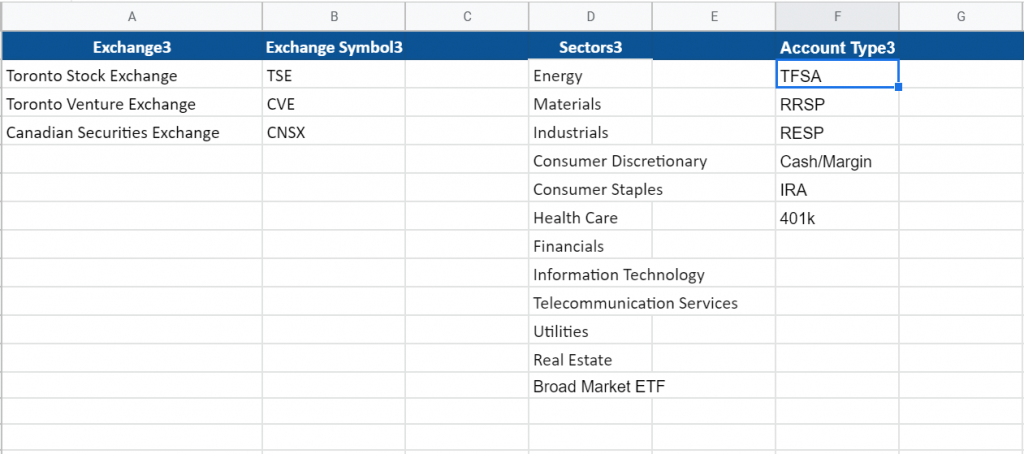
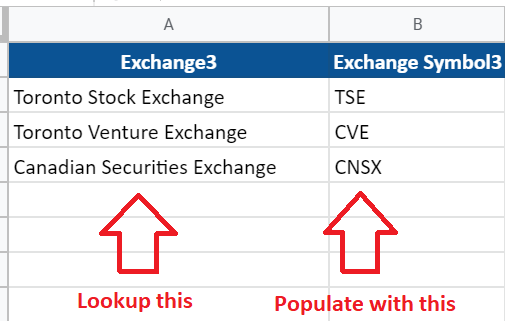
Next goto the “xLookups” Tab and enter the following. Please note that I am located in Canada, and this example is Canadian Focused but can easily be updated to address any market and account type.
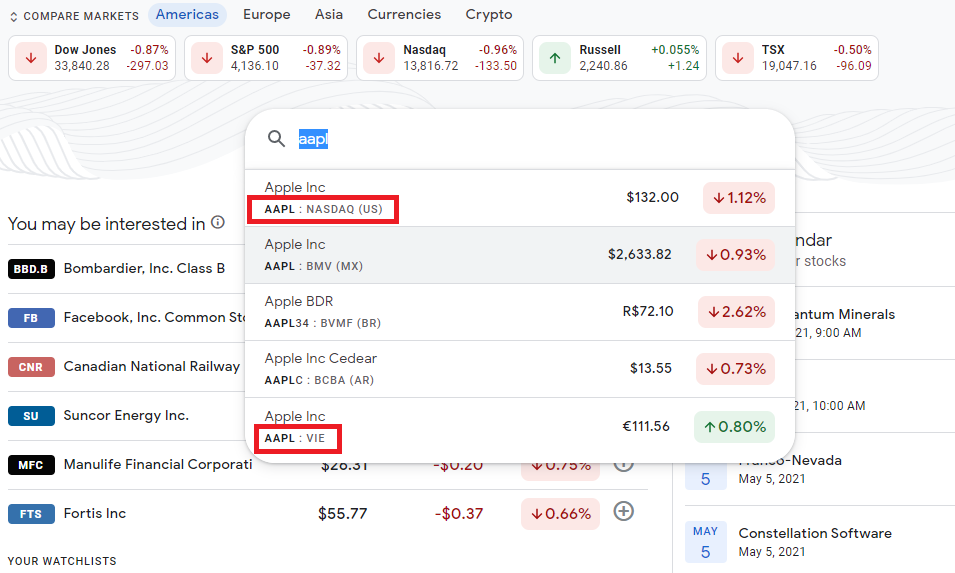
For the Exchange3 column and Exchange Symbol3 column you will need to find out the exchange symbols and convention for their lookups. You can do this by going to the google finance page and searching for your symbol as shown with the example for Apple.
Here we see AAPL is traded on the NASDAQ and Google refers to this as NASDAQ when referencing the exchange, but also on the Vienna Stock Exchange using the Exchange symbol of VIE. Continue the process for each exchange you want to track stocks on and add the Exchange Name to column A of the “xLookups” tab, and the Exchange Symbol to column B of the “xLookups” tab.
Next, goto the “Summary” Tab, and in Cell “A2” add the following formula.
Please note the above example will only add TFSA, RESP and RRSP to the Summary tab. If you are using other account types you will need to adjust the formula to display these on this sheet. This is the tab that will be used to create visualizations, charts/graphs, and other fun stuff that will be addressed in further posts.
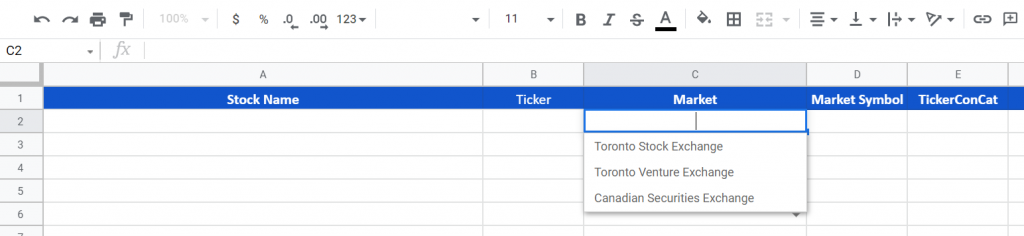
Next, goto the “Stock Tracking” Tab, and we will add the dropdown menus to the “Market”, “Sector”, and “Account Type” fields.
Market Lookup
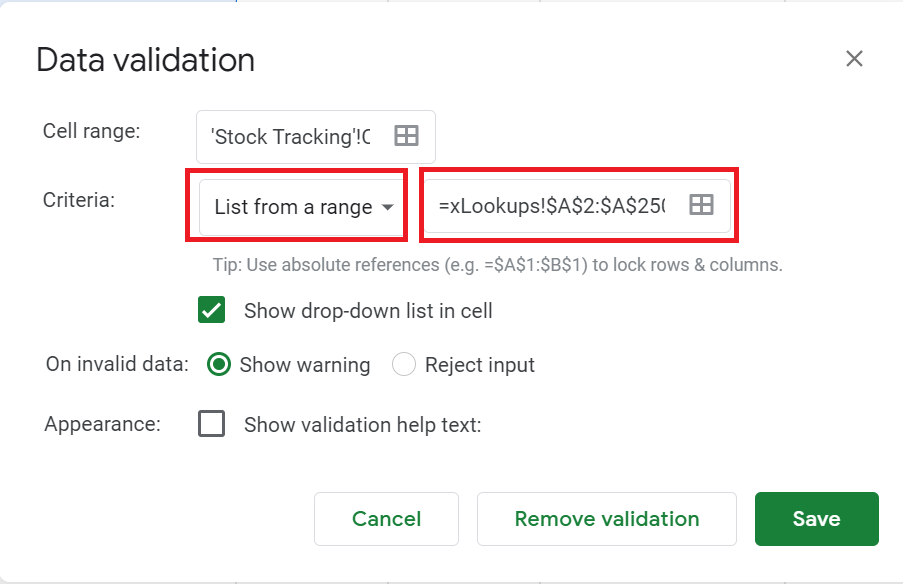
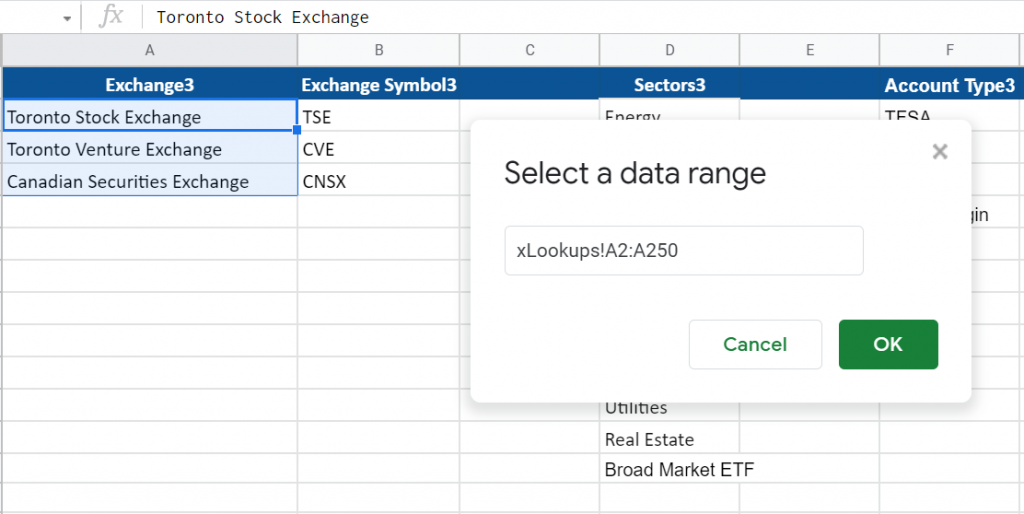
For the “Market” Column lookup, select Cell “C2:C250” (this will add the lookups to row 250, if more are required) continue this for the necessary number of rows. Now right click in the selected columns and select the last option “Data Validation” and the following menu will pop-up.
Change the “Criteria” option to “List from a Range”, and in the box beside “List from a Range” click the 4 squares at the end and it will prompt you to select the range. To do this goto the “xLookups” tab and select Cell A2:A250.
Click “Ok” then click “Save”, and now you will have a dropdown menu in the “Stock Tracking” Tab to select the exchange.
Sector Lookup
Next goto the “Sector” column (F) on the “Stock Tracking Sheet”, and select Cells f2:f250, and right click and select Data Validation again. Follow the same process as above and select Cells D2 to D13 on the “xLookups” tab. Click “Ok” and “Save” on the data validation window.
Account Type Lookup
For the “Account Type” column (G) repeat the above process again and select the “Account Types” from the “xLookups” tab in Column (F). Once the drop-down menus have been added you should see a down-arrow in the right corner of the cells that were updated, and you will be able to see your options.
Exchange Symbol vLookup
Next we need to add some formulas and calculations to get the ticker symbol and exchange in the correct format so Google Finance can do the current price lookup. To start in the “Market Symbol” column on the “Stock Tracking” Tab we want to do a VLookup on the “xLookups” sheets to find the proper Exchange symbol.
In the “Market Symbol” column of “Stock Tracking” Tab select cell D2 and enter the below formula.
=VLOOKUP(C2,xLookups!A2:B250,2,FALSE)
Continue this process by adding the the formula to all cells in the Market Symbol column to cell 250. Be careful when you do this as for example if you just drag the cell down to copy the formula you will be changing the the formula and incrementing the formula values by 1.
Moving on to cell D3 it should have the following formula.
=VLOOKUP(C3,xLookups!A2:B250,2,FALSE)
The only thing that should be changing in this formula is the first parameter in the vlookup formula, “C2”, and in the following row it should be C3, then C4, etc…. This can be tricky to do and keep the formula’s correct and in order. I typically use excel to do this which takes a few extra steps but is alot easier then manually entering the changing formulas.
To do this split the formula up and essentially have the value that changes in its own column. For the cells that just need to repeat down without changing (A, B & D), use copy and paste to fill these down to row 250. For column “C” in this example, select the cell and drag it down to row 250. This will change the value from C2 to C3, to C4, etc….
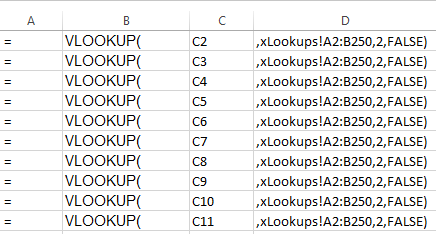
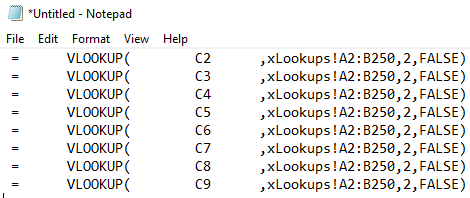
Next copy all data as is, and paste it into notepad and it should like similar to the below.
Use search and replace to remove the tab, and unnecessary spaces, and once completed to back to your Google Sheet and select cell D2 and paste the copied formulas from Notepad. This will paste the proper formulas into all cells.
TickerConCat
The next column we will work on is the “TickerConCat” which simply just takes the stock ticker symbol, and the market exchange and concatenates them into a format that can be used to query Google Finance. To do this is fairly simple and just add the following formula into cell “E2”.
=CONCATENATE(D2,”:”,B2)
Once this has been done, drag the small square in the bottom right corner of the cell down to row 250. This will updates the values within the formula as you go down the rows.
Google Finance Query
Now we can add the Google Finance Lookup for the stock Symbol. To do this select cell H2 and enter the following formula.
=GOOGLEFINANCE(E2)
Once this has been done, drag the small square in the bottom right corner of the cell down to row 250. This will updates the values within the formula as you go down the rows.
Market Value
Now we can calculate the Market Value of the holdings by adding a simple formula in the K2 field which is simply multiplying columns “I” (current position size) and column “H” (Current Price)
=H2*I2
Once this has been done, drag the small square in the bottom right corner of the cell down to row 250. This will updates the values within the formula as you go down the rows.
Profit and Loss Calculation
To calculate the Profit and Loss simply add the following formula which calculates the difference between Book Value and Market value columns.
=K2-J2
Once this has been done, drag the small square in the bottom right corner of the cell down to row 250. This will updates the values within the formula as you go down the rows.
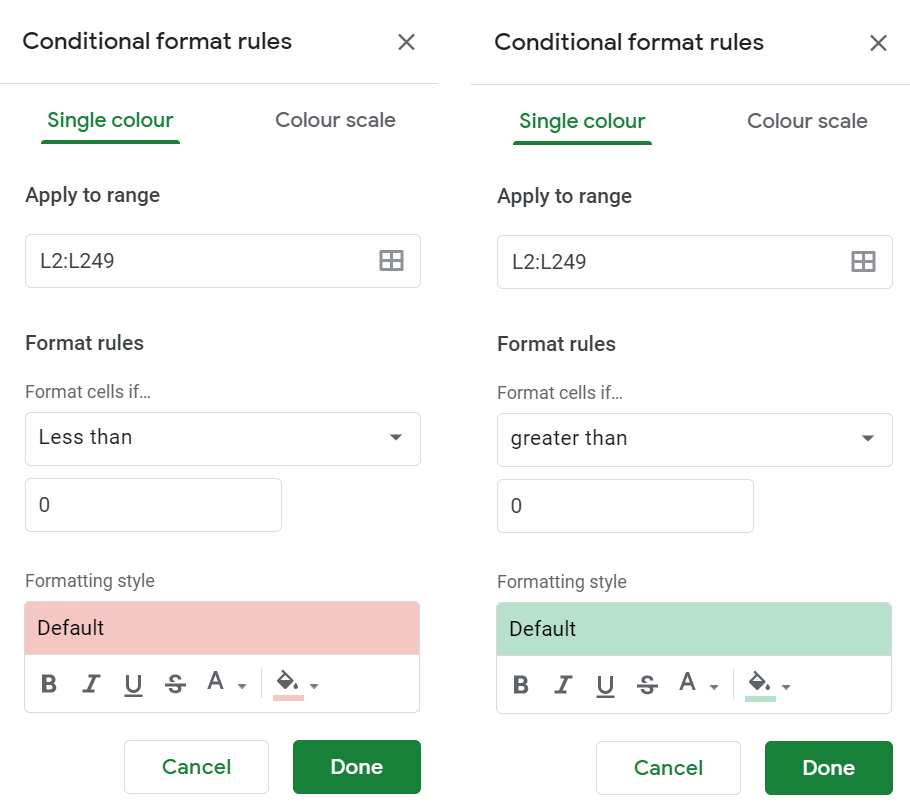
Next select cells L2 -> L250 and right click and select conditional formatting. This will change the colour of the cells red or green depending on profit or loss. To do this add a condition where if the value in this cell is above “0” make the cell green, and add a second condition for if the value is below “0” it will be red.
Now the Fun Part
In the “Stock Tracking” start to enter your portfolio information in the cells and watch the data update as you go.
As you continue to enter the data is will populate and do its calculations. If you wish to do any charts / graphs / or other visualizations you will need to do this off the “Summary” tab as the “#N/A” cells and drop-downs with no values will mess up the visualizations.
Visualizations and other fancy things you can do with this now will be described in a following blog post.